Showing posts with label parts. Show all posts

Tuesday, March 31, 2020

Chasing Tone: 50's Guitar Wiring

As you know, I, like many other musicians, are always on a quest for tone.  I've written many posts on this blog about the subject.  Whether it is guitars, pickups, electronics, or capacitors, I am always on the hunt for a way to achieve the perfect. tone.

I came across an article a few weeks ago that was talking about a surprisingly easy and inexpensive way to improve the tone of a guitar.  Here's the link:

Mod Garage: Three Ways to Wire a Tone Pot

The author brought up a good point.  We look to the 1950's Gibson PAF pickups as the "Holy Grail" of all pickups.  But in all honesty, pickup makers today can create pickups that are just as good, if not better than those vintage PAF pickups.  So what's the difference?

As I've written before, many players are extremely fickle about their tone capacitors.  Some claim they can hear the differences between cheap ceramic caps and paper in oil caps.  Here are a few blog posts I wrote about trying out different caps.

Squeezing The Tone

Squeezing the Tone, Part 2 

Long story short, changing the capacitors did nothing for me.  For the heck of it I bought an old Russian paper in oil cap, and soldered it into my Dean Dixie Rebel.  Honestly, I couldn't hear a bit of difference.  That cap cost me $5, and that's on the cheap side.  The modern day Emerson paper in oil caps cost $20 a piece.  Let's be honest, $20 is way over the top for a capacitor.

So when I read the article posted above I originally took it with a grain of salt.  But the author said something that I hadn't thought of.  We accept those PAF pickups as the "Holy Grail" of pickups, but we are forgetting one thing.  They were also wired with 50's wiring.

Now I know you are wondering, "What does that have to do with anything?"  Well take a peek here.
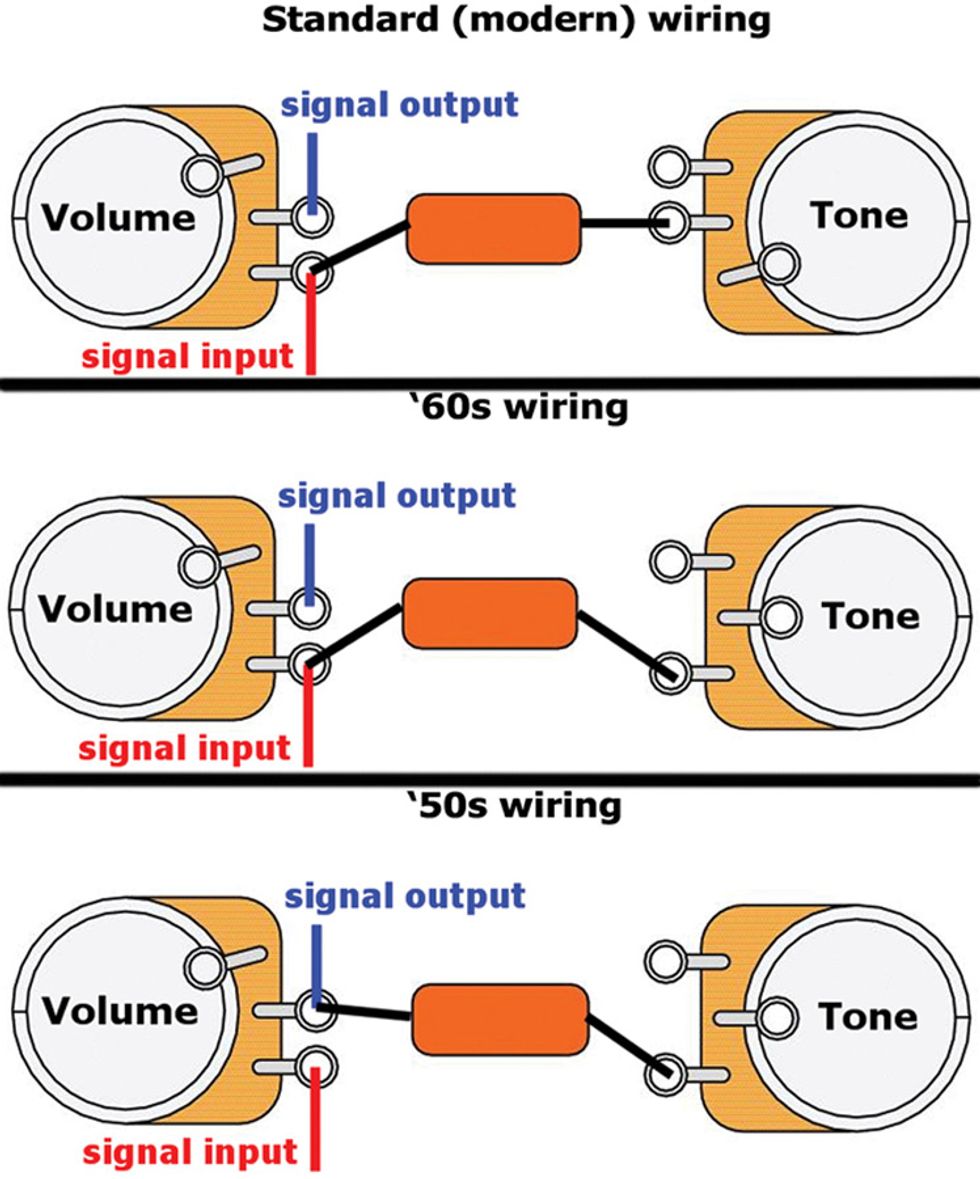


From the article:

The tone cap connects to the volume pot’s output lug, rather than its input.

What’s so special about the ’50s wiring? It will influence the guitar’s performance in three major ways:

1. The overall tone gets stronger and more transparent. It’s difficult to describe, but I think of it as more “in your face.”

2. The typical treble loss that occurs when rolling back the volume is greatly reduced, and both the volume and tone controls react more smoothly and evenly without the typical hot spots. As a side effect, it’s easier to clean up an overdriven amp by simply rolling back the volume on your guitar a bit.

3. The tone and volume controls interact with each other—something you may know from certain early Fender tube amps. When you change the volume, the tone also changes a little bit and vice versa. Such interaction may feel strange at first, but it only takes a few minutes to get used to.

I've cut out a lot of the technical jargon, so I'll boil it down here.  The main problem with modern wiring is when you roll back the volume or the tone knobs.  Simply put, it doesn't sound great.  When backing off the tone knob, the biggest problem is the loss of volume in the high/treble sounds.  

So I decided to use my Guild Bluesbird as a guinea pig for this project.  I've written about it before.  Here's the link:


In that blog post I showed a few mods that I had made to "squeeze the tone" out of it.  Namely, I replaced the Alnico 5 magnet in the 59 neck pickup to an Alnico 2.  I also changed the cheap ceramic caps out for "Tropical Fish Capacitors."  (Yes, that really is what they are called.)

So here is the guitar we are working with.


And here is the inside control cavity. 


Let's fast forward to changing the wiring.


Honestly, it wasn't that hard or time consuming.  But here's the question... did it deliver promised results?  I mean, I've heard a lot of rumors, inuendo, and B.S., but did this actually work?  

Yes.  Yes it did.  I noticed a huge difference.  The sound really was more, "In your face" as described by the article.  Where I really noticed it was turning down the tone pots.  The high/treble sound didn't drop out like it had done before.  In other words, there was no loss of volume of the high/treble notes. 

I also noticed the pickups sounded much brighter.  The 59' neck pickup (with an Alnico 2 magnet) sounded extremely balanced.  They might be considered too muddy for high gain/metal players.  But with 50's wiring it sounded amazingly balanced and soulful.  

The 59' bridge pickup (stock) was much brighter.  It actually reminded me of 1950's music.  I know all the advertisements like to say their vintage pickups are warm, blah, blah, blah, etc.  Have you ever listened to late 50's/early 60's music?  Think of the Beach Boys.  Listen to them and realize how bright their sound is.  I know they are playing Fender instruments, but still, the 50's sound was pretty bright.

With 50's wiring the Seymour Duncan 59' sounds exactly like it rolled off the line at Gibson back then.  What also surprised me was that the bridge pickup had quite a bit of bite that it never had before.  I think some folks might mistake it for a Seymour Duncan Pearly Gates pickup due to the amount of bite it had.  

The verdict?  The verdict is yes.  In fact, it's a huge yes!  In complete honesty I didn't think it would make that much of a difference.  And the one thing I hadn't thought of was, "How do different types of capacitors react with 50's wiring?"  Those paper in oil caps might make a bit of a difference with 50's wiring.  

I already had quality Tropical Fish Capacitors installed in the Bluesbird.  So I'm not sure how much (or little) of an upgrade they are over cheap ceramic caps.  But to get back to the point, 50's wiring really did make that much of a difference.  I'm going to be doctoring a few of my guitars in the coming weeks.  

I am thankful for Premier Guitar for running the wiring article.  I am reminded of what a violin luthier told me.  He said, "We can make anything as good as Stradivarius these days due to sharing so much information.  We don't have to keep reinventing the wheel every ten years."  

So I have written this blog post to keep sharing information.  I believe it's important.  I've seen the quality of guitars skyrocket in the last twenty years.  I've seen the parts on those guitars skyrocket as well.  Sharing information is pivital to making amazing music.  I hope I've helped you out some.  

Wednesday, February 10, 2016

The Bass! Part 5, The Real Punk Rock Bass

So I have had a long series of posts about this bass.  Here are the previous posts.

Part 1.

http://angjellockheart.blogspot.com/2014/10/the-bass-there-are-no-such-things-as.html

Part 2. 

http://angjellockheart.blogspot.com/2014/10/the-bass-part-2.html

Part 3. 

http://angjellockheart.blogspot.com/2014/10/the-bass-part-3-punk-rock-bass.html

Part 4.

http://angjellockheart.blogspot.com/2014/10/the-bass-part-4.html


So what could possibly happen that this time around with this bass?  To make a long story short, I have already replaced the pickups, the bridge, the pickguard, and moved the output jack.  I also refretted the neck, because honestly, those frets where more or less falling out of the neck.

But after a bit of time, I had to realize that the neck was hopeless.  It was so warped that it had dead spots on it no matter what I did.  So when Guitarfetish had a sale on factory blowout parts, I searched for a bass neck.  Guess what?  I found one.

So I got it for a nice price of $30 plus shipping.  I think the S/H was around $10-$15, but I can't remember.  I got a good deal on it because it had not been cut for a nut yet.  So I cut the slot, and then had to order a bone blank from Hong Kong.  I could have bought it locally, but they want $10-$12 anywhere I looked.  So I bought it for $1.51 (shipping included) from China. 

I then cut it ever so nicely, and got it to fit.  I wish I could say the same thing about the neck.  The neck pocket was a little tight, so I had to shave off a bit of the underside of the neck to get it to fit.  But this bass is so beat up, what's a little damaged to one side?

But I had forgotten one thing.  The original tuners were crap.  So I went back to Guitarfetish, and ordered some cheap bass tuners $17.95 plus $12 shipping.  So my "cheap" project is not starting to get so cheap anymore.

The one thing that made me completely hostile was not the tuners themselves, but the screws that came with it.  I ended up breaking two screw heads completely off.  I've never had that happen in the entire time I have been repairing guitars.  Now, I had it happen twice on one project.  Just complete POS screws.

So let me get everything added up.

Bass - Free!
Bridge - $20
Pickups, pots, and parts - $65
Pickguard - $17
Neck - $40
Tuners - $30
New Strings - $20
Time working on bass - ... a lot.

Total - $192

Mmmm.  Maybe I should have just bought a Squier?  I mean, it still doesn't exactly play that great.  The neck pocket is too deep.  I mean, I'm already shimming the crap out of it.  I might have to shim it some more.  It's just been a money pit.  But I only have myself to blame.  I can never let a project go. 


And to be honest, if I did want to part it out, I can still do that with some of the parts.  Namely, the pickups, bridge and neck.

But still, we don't do this for the money.  We do it for the love of music.  But man, does music have to be so expensive?  If I ever fail as a musician I can always use this as a boat anchor.  I wonder what a fishing Captain makes?

Friday, October 24, 2014

The Bass! Part 4,

Part 1:  http://angjellockheart.blogspot.com/2014/10/the-bass-there-are-no-such-things-as.html

Part 2:  http://angjellockheart.blogspot.com/2014/10/the-bass-part-2.html
Part 3:  http://angjellockheart.blogspot.com/2014/10/the-bass-part-3-punk-rock-bass.html

So I had been waiting on the bridge to arrive, and it finally did. 


While it was not an exact replacement of the old one, the saddles lined up just fine.  And in the end, that's what's important.

I then had to deal with the pickguard not lining up exactly.  However, the use of a long screw took care of a, now, tiny problem.


As you can see, it worked out pretty good.  It holds rather nicely.

However then came a problem I did not forsee.  This happens with older guitar or bass necks.  With no tension on it, the neck is straight.  But with the strings at full tension the heal kicks up.  So I am torn between having insanely high action, or the frets not being playable from the 12th fret up. 

Now, the normal way to correct this is to yank out the frets below the 12th fret, shave the fingerboard, and replace the frets.  However, the fingerboard is maple, and if I shave it I will have to re-finish it.  Right now, I don't have time for that.  I have to make the bass somewhat playable for the next gig. 

Once we cross that bridge, I will go back and start work on it.  I might be able to shave the frets down, and make it playable.  But I'll deal with that when I get there. 

I knew I would be a pain to put this thing together, but I didn't think it would be "THIS" much of a pain.  I did a lot more work on this thing than I had planned to. 

But here's the result.  Not too bad.


Sunday, October 19, 2014

The Bass! Part 3, Punk Rock Bass

Part 1:  http://angjellockheart.blogspot.com/2014/10/the-bass-there-are-no-such-things-as.html

Part 2:  http://angjellockheart.blogspot.com/2014/10/the-bass-part-2.html

So I have been having problems with the wiring.  Seriously, I've been working something like a week on it.  But instead of making a long story out of it, I'll just say this.  It seems one of the volume pots was bad, and not sending enough signal through to the tone pot.  That's why I couldn't get the tone pot to work.

I do want to say now that the volume is LOUD!!!  Now that I have a proper working volume pot, it's surprising just how loud these Dragonfire active pickups are.  I can't wait to get strings on this bass.

And simply put, I yanked out everything, and started with all new parts.


So after getting all the electronics working, I made holes for all the screws, and fitted the pickguard and output jack. 

Even though I don't have the bridge yet, I used my straight edge to get a proper angle on how I should shim the neck.  I used a rather thick piece of wood, and shimmed it.  It came out exactly how I wanted.  I may have to adjust it further once I get the bridge in, but it's a good start.

So onto the pictures!!!


So the bass looks very worn and punk rock to me.  It was a great bass to get some practice in on a few things.  More to come when I get the bridge in the mail, and get the bass finally set up.

Sunday, October 12, 2014

The Bass! There Are No Such Things As Universial Parts

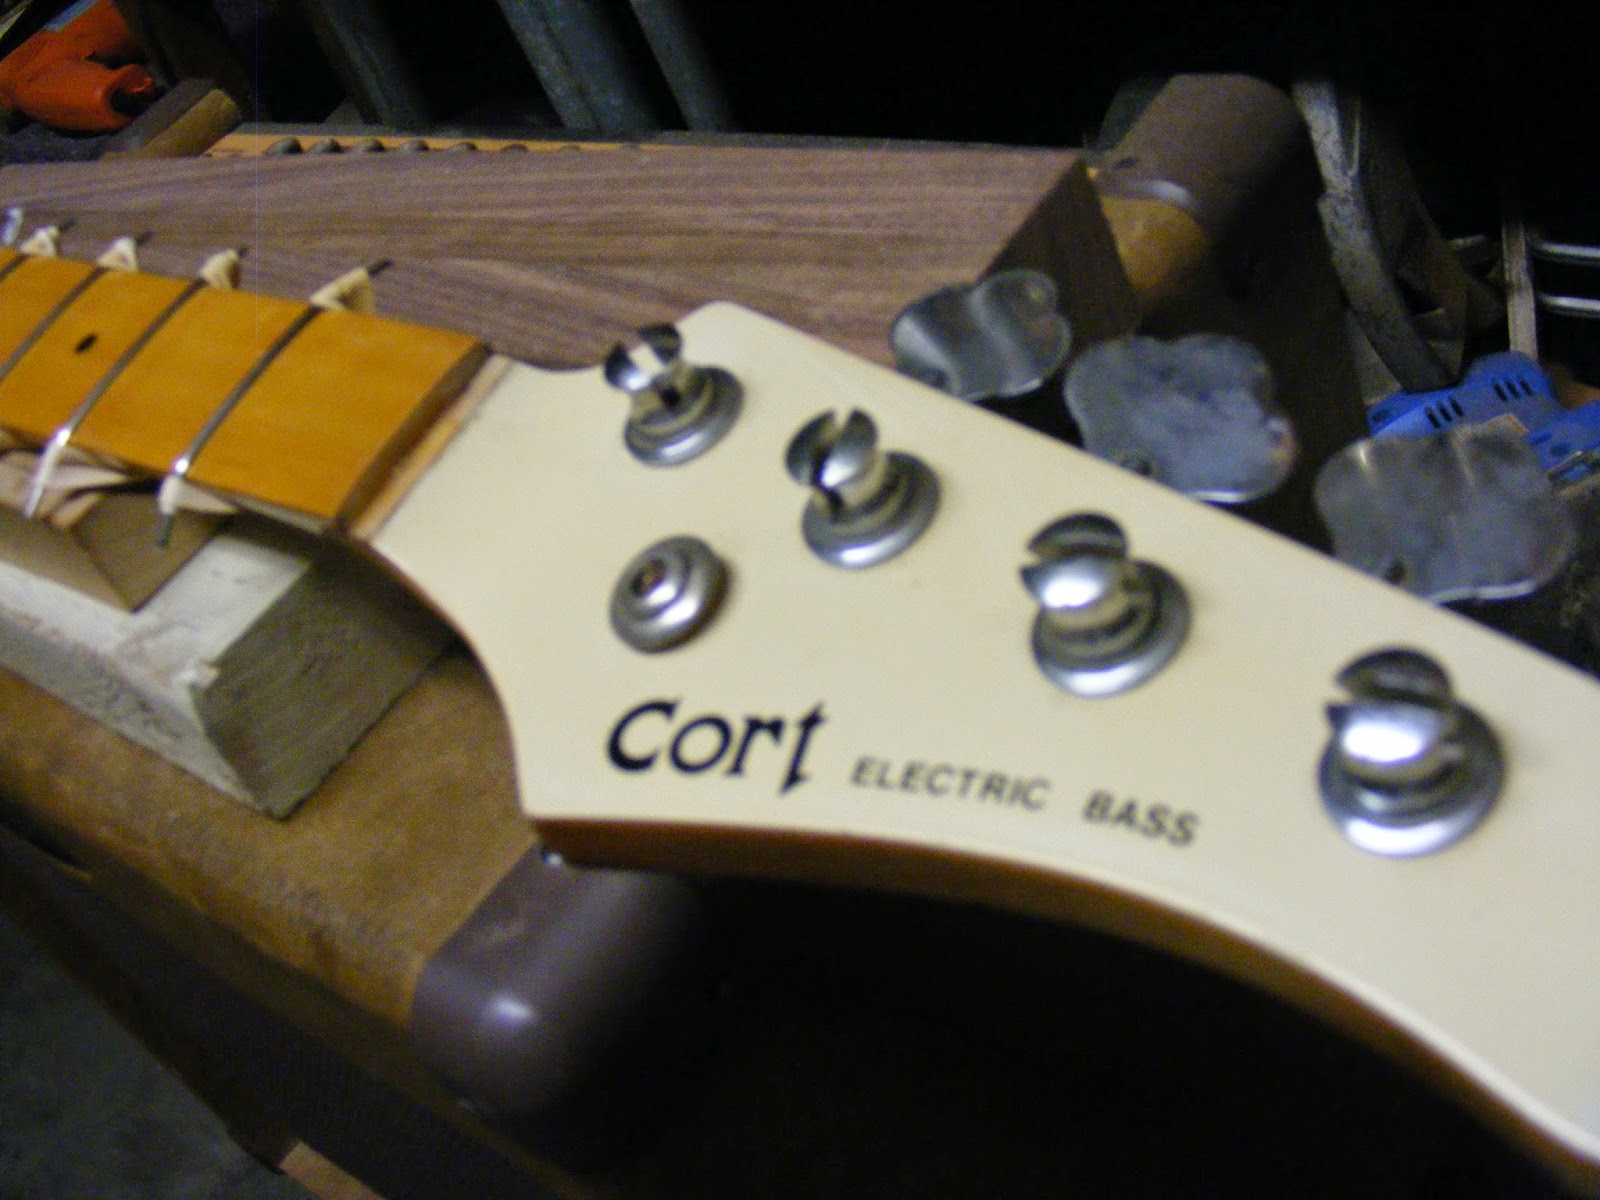
I had a friend ask me about this Cort bass he acquired.  It was just a neck and body.  It was missing the pickguard, pickups, and electronics.  I told him it would cost more to get it up and running than to buy a used Fender MIM Jazz Bass at Guitar Center.  So in an act of kindness/vengeance he did something very kind/evil to me.  He gave it to me.

This is kind of two-fold good/bad.  I love all things musical.  But even for a roughed up bass that needs more work than it deserves, I just can't let go.  I can't let it go.  So I started work on it.

First off, the frets were shot.  I can do a re-fret in my sleep, so that was the first thing to be done.  And to be honest, the old frets came out easier than any other instrument I've worked on.  So this one really needed some work.


Okay, that's the quick version.  I didn't want to bore you with detail.  Let's say, it's done, Boo ya!

Next, look at this:


You know, the problem with this P-Bass?  It's not a PJ Bass!!!!!!  So I decided to add a Jazz pickup to it.  That means I moved the output jack.  You can see where I drilled the hole for it. 

Let's move on.  Here's the nice little hole I drilled for the Jazz pickup.


I decided to give the Dragonfire active pickups a try.  I was thinking about GFS pickups, but let's be honest, Artec makes all the overseas pickups, I figure there couldn't be too much difference between the two, but that will be in another post.

Here is me fitting the Jazz Bass pickup.


And here is me trying to fit the pickguard to the body.


This is going to be tough.  The Cort has it's own type of pickguard.  So I am making due with what I have.  I had to widen the pickup route for the pickup.  I may have to route out the wood to fit these P-Bass pickups.  I will also have to route out a spot for the truss rod adjuster.  I will then have to make all new holes for the screws.  Not to mention, a new bridge is on it's way from Hong Kong. 

Here's something that I have never encountered before.  When Dragonfire pickups shipped the parts, they included the correct pots.  However, they didn't send any washers, lock washers, or nuts.  What's up with that?  I've never had that happen before.  Never.

So obviously my work is far from done.  What does that mean?  Another blog post of course!  Stay tuned.  I may get a working bass, I may get a pile of junk, who knows?

Thursday, February 23, 2012

The Ongoing Baritone/ Tele/ Cello Project, Part 4, Not So Baritone

The original post, http://angjellockheart.blogspot.com/2011/03/baritone-cello-guitar.html

Part 1, http://angjellockheart.blogspot.com/2011/05/ongoing-baritone-cello-tele-project.html

Part 2, http://angjellockheart.blogspot.com/2011/05/ongoing-baritone-tele-cello-project.html

Part 3, http://angjellockheart.blogspot.com/2011/05/ongoing-baritone-tele-cello-project_29.html

So I've had a little change of heart/ design when it comes to the Tele project.  Frankly, I can't get a good baritone neck at a decent price, so I got a regular Tele neck.  I got it from the same place that Fender gets their higher end Squier series, from Hong Kong. 

I've found a nice little place where I can order things straight from the Hong Kong factories.

http://www.eyguitarmusic.com/

I have been really happy with what I have ordered.  I am getting the same stuff I would normally get from other places, I'm just cutting out two middlemen, and two trips of shipping.

Here's the pictures of the neck.


I also got the last pieces to complete the build.


You wouldn't believe how hard it has been to find an output jack.  I've been to just about every store in the bay area, and can't find one.  It's bordering on ridulousness.  But, this place has all the output jacks I want to buy.

And one other thing...


A double bladed hot rodded bridge pickup.  I have a thing for double bladed pickups, and this one is right up my alley.  And if I hate it, I have another Kent Armstrong pickup that I can replace it with.

My next step is to route out the neck.  Here's a picture for clarity.


The body is basically complete except for routing out the neck pocket.  So, I am going to do that in the near future, and post another blog when my wood work is hopefully complete.