Showing posts with label repair. Show all posts

Saturday, April 18, 2020

Guitar Repair Day: Dean Resonator Edition

So with the Covid-19 bug going around there hasn't been much to do.  However, my friend Phil found something for me to do, by accident of course.  He owns a Dean resonator that has been his number one personal guitar for years.  And during all those years I have repaired it numerous times.  Let me think off the top of my head what I've done.

1.  Complete re-fret.
2.  Fixed a broken headstock.
3.  Repaired the electronics a number of times.
4.  This includes replacing pots and capacitors.
5.  Buffing out the guitar.
6.  Replacing both pickups.
7.  Repairing/replacing the screws that hold the tuners in place.
8.  Set-ups (of course.)

So yeah, I've tweaked it a few times to say the least.  Well, this last time the guitar ended up falling and putting a hell of ding into the binding and fretboard.


So, what to do?  Well, if this was an episode of Dan Erlewine's trade secrets here's what he would do.  He would take out all the frets.  Then remove the binding.  Next, he would fill the small pieces of the wood back in.  Then it would be time to install new binding.  After that was set, new frets would be installed and dressed.

That, of course, would be something like a $700 job.  For $869.00 Phil could buy a brand new Dean resonator from Musician's Friend.

https://www.musiciansfriend.com/folk-traditional-instruments/dean-chrome-g-acoustic-electric-resonator-guitar/515945000457000?rNtt=dean%20resonators&index=2

So I had to fix it in a way that wouldn't interfere with his playing, but not cost an arm and a leg.  Here's what I decided to do.

First up, it was time to break out the C.A. glue.  I was simply going to fill the crack, and sand it smooth.  It sounds easy, but a lot of things can go wrong.  Here's what's going on in the photo.  I filled the crack with C.A. glue, covered it in cellophane. and clamped it tight.  C.A. glue won't stick to cellophane which is why I used it to protect my clamp.  


Now let's see what we are working with.


The good news, is that, it's holding all together.  The bad news, is that, it doesn't look great.  But that's to be expected.  That's what the next phase of the project is for.

I normally don't put duct tape on guitar, but this called for special circumstances.  I planned to use my rotary sander, and I didn't want it sanding parts that weren't the binding.  Important note: With a rotary sander I made sure to wet sand with a fine grit sandpaper.  In this case 600 grit.


Since I can't hold the guitar, sand, and take photos at the same time, we're going to fast forward to after I've sanded.


The side is getting there, but let's concentrate on the top.  I took a straight razor blade, and shaved the binding flat.


Now, to smooth this down I needed to sand it with a high grit sandpaper.  Luckily C.A. glue sands out extremely nicely.  I used 1500 grit automotive sandpaper.


The trick is to wet sand.  Keep plenty of water on it, and don't be afraid to wash out the sandpaper.


If you look up on the neck you can see where the neck had previously broken.  But back to the sanding.  The sanding smoothed everything out.  I also shaved down a few places on the fretboard with the straight razor again.


But my next tool is the real secret that shouldn't be a secret to anyone in the luthier trade.  Break out a buffer!


I've found a buffer to be my best friend in my workshop.  It can take care of all sorts of things.  In this case, it smoothed out where the wood met the binding.  It also smoothed out the hardened C.A. glue.  This is the result.


I should have taken a better photo, but good news is that, the side of the guitar and fretboard are smooth once again.  The binding is whiter where I repaired it, but it is smooth.  After this, there is one last thing to do.


Don't forget your Ken Smith polish.  That stuff is great.  It's getting kind of hard to find these days which I don't understand.  It's the best stuff I've come across in over 20 years of repair.  

After all the work that came before, the next part was easy.  I set her up, double checked a few things, and make sure everything was right.  Phil was happy with her.  So yeah, it was a tough break, but at least I kept the cost way, way, way below the Dan Erlewine special of $700 or so.  And if Phil puts another ding in her, he knows I'll be here.  Repair's my thing, and I enjoy doing it.  

Monday, February 17, 2020

New Guitar Day: Dean Custom 450

I know, I need another "New Guitar Day" like I need a hole in my head.  However, there's a story behind this one.  There's always a story, but this one is pretty good.  You see, it was a dark and stormy night on Facebook Marketplace.  I had noticed an add that simply read, "Guitar" in the Musical Instruments category.

I opened up the ad and saw it was a Dean guitar.  Now for those of you who've read my blog for a while, you know I love Dean guitars.  When I looked at this one I recognized the shape, but couldn't remember the name of it.  So I went to the Dean Guitars official page.  It wasn't listed there.  It seems they don't make it anymore.

After that I went to my trusty friend, "Google."  It was there I found the name of the guitar was the "Custom"  But something didn't look right.  The listed guitar was a set neck with EMG pickups.  The Custom 350 wasn't.  As I wandered around the internet I found out that Dean made a "Custom 450."  That's what this guitar was.

It was exactly as pictured.  It was a set neck with EMG pickups in a natural color.  I think the seller made the same mistake as I did.  He thought this guitar was a Custom 350.  You see, he was selling the guitar for $200.  The Custom 350 sold new for $300.  But the Custom 450 sold new for $600.  Again, they look a lot alike.

When I talked to the seller, he said he bought the Dean to learn to play guitar.  It just didn't happen for him.  So he was moving on.  That's one reason he probably listed the guitar as, "Guitar" on Facebook Marketplace.  He just didn't know the in's and out's of the music industry.

So while I don't need another guitar, I just couldn't let this deal pass me by.  And if I want to sell it later on, I can do that.  Hey, even I realize the resale market isn't great for Dean guitars, but I could possibly make a small profit.

So now let's go onto the photos!


And it came with a leather soft case to boot!  So that added to the deal.


First up, the good.  

All the wood and parts are top notch.  It's really well balanced.  After setting it up, the fretboard doesn't have a wave or twist in it at all.  It's perfect.  Dean likes using the super jumbo frets.  I ended up fret dressing it for two reasons.  The first, is that, I always fret dress my guitars.  Every guitar built needs one, but only high end guitars end up receiving them.  

The second reason is the frets are so dang high it knocks them down a bit for easier playing.  The third is I can set the action extremely low with a great fret job.  

Next up, the gray area.

So Dean factory installed EMG pickups on this model.  That's quite a step up from the usual overseas pickups.  However, players tend to either love or hate EMG pickups.  I've never been crazy about them.  I've always been with the crowd that says, "EMG pickups make all guitars sound the same."  I've found that to be somewhat true except for two guitars.

The first was on an ESP Eclipse 3 that I jammed on in a Sam Ash.  That guitar has an EMG 81 bridge/ 60 neck set.  For some reason it wasn't overly bright like so many I had heard before.  I don't know what made that guitar different?  I had never played that model before, but it was an amazing guitar.  I can see why players like them.

Of all the EMG pickups, I have to say I liked the EMG 85.  It has an EQ that is similar to a Seymour Duncan Distortion.  I'd say the EQ was:  Treble:9, Mids: 8, Bass: 5.  I always thought it should be the main bridge pickup for active pickup equipped guitars.  Instead, they always put it in the neck.

So I immediately decided to so a little pickup swapping.  Since EMG's are quick connect, I just swapped the EMG 81 and EMG 85's positions.  I have to say that was one of the best musical decisions I've made in my life.  The EMG 85 rocks in the bridge position, where the EMG 81 makes a clean neck position pickup.  

Like I said earlier there were only two EMG equipped guitars that I've played that didn't sound overly bright.  This was the second one.  I'm not sure why it sounds so balanced compared with so many other EMG equipped guitars, but this one sounds really good.  

The next upgrade for this guitar, is that, it has 24 frets.  Take a look at the double dots on the last fret.  Yep, that's a 24 fret guitar.


I put this under my "Gray Area" since some players don't need or want 24 frets.  I realize that for some songs you need those two extra frets.  But I realize that a lot of us don't play past the 15th fret.  In fact, a lot of us just play "Cowboy Chords" on the first three.  So again, this would be great for some players, and dismissed by others.  It's really up the individual player.  

The Ugly:

Let's be honest.  This guitar is supposed to compete for metal player crowd.  Specifically, this is Dean's alternative to Ibanez's RG Prestige series.  Here's an example:


So if you ask any metal player what Ibanez guitars are best known for they'll say, "Steve Vai!!!"  But after that they will tell you, "The Ibanez Wizard 2 neck.  For those not in the know, Ibanez has extremely thin necks.  Shredders love thin necks.  They help make playing easier and faster.

So what kind of neck does the Dean Custom 450 have on it?  Well, it's not good.  You start with a Gibson 50's neck, then you make it wider.  By the time you are at the 12th fret, it starts to feel like a seven string guitar.  At the heel this has to be the biggest neck I've ever played in my life.  I know Dean likes big necks.  Heck, I own six Deans and have owned a bunch of others in my life. 

However, this is ridiculous.  The neck up to the first three frets starts off just fine.  It just keeps getting thicker and wider as the neck goes on.  Any player who would put this up against an Ibanez RG is going lean towards the easier playing Wizard 2 neck on the Ibanez.  

The New:

As I mentioned earlier Dean has discontinued the Custom 350, 350-F, 450, and 450-F series.  However, they have replaced it with something that I think will compete with Ibanez a little better.  It's called the Exile series.


The first time I saw the photos I was amazed.  This one comes with the new EMG pickups, the 57 and 66.  It's also built with 24 frets.  However, it also comes with a heck of a price, $1,100.  Whew!  And if you buy the Floyd Rose or seven string models the price only increases.  

It's wonderful guitar.  I only hope they haven't priced themselves out of the market.  I mean, I had a hard decision on paying $200 for the Dean Custom 450.  Paying $1,100 is a big jump up from that.  

But let me get back on track.  I'm digging my new guitar day.  I'm having fun with it.  Now I just have to find a place to put it.  Maybe it's time to build a new wall hanging guitar rack?  Yeah, right after I add a new wall.  Till then, keep rocking, and above all else, have fun with it.

Saturday, February 15, 2020

House Repair, Err, Actually Bird House Repair

A year and a half ago I put up a number of birdhouses around the property.  I've actually written quite a few blog posts about them.  I was really proud of the work I completed.  Not only did I customize them with "Squirrel Guards," I also made sure there were drainage holes for water.

And to absolutely make sure they would last, I painted them with enamel paint.  Next, I used enamel spray paint so the birdhouses would match the colors of an oak tree.  Honestly, I went all out for those houses.

So it made me pretty angry when I found the roof tore off of one.  Well I decided to do something about it.  I was going to make a new roof, but when I went to take the birdhouse down, I found the roof sitting inside the house.

Then, a Cuban Tree Frog jumped up out of the house, hitting me in face, causing me to fall off my ladder.  I really hurt my left toe falling.  But after I felt a little better, I took the birdhouse to my workshop.  I made sure to take lots of photos of the repair.  I'll explain my work as I show the photos.

So here's the birdhouse and roof on my bench.


It's not in that bad a shape.  The wood was a little warped, but other than that it's alright.  Let's take a peek inside to see if there's anything wrong with it.


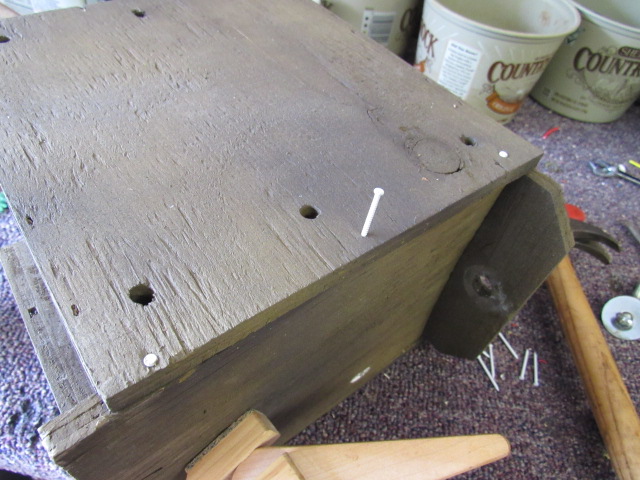
No, it's just a little dirt.  I decided to use some "helping hands" in the form of clamps.  They held the top on while I nailed the roof down.


I found these awesome tiny white finish nails in one of Dad's parts buckets.  They were perfect for this job.


And here she is, as good as new.


Now it was time to put the birdhouse back on the pole.


Now that I've fixed the birdhouse I'm hoping to have a pair of birds nest in it this spring.  If not, I'm sure the Cuban Tree Frogs will hang out in there.  They will bide their time until I walk by, jumping with all their might, smacking me right on the forehead.  

Sunday, January 12, 2020

Time For A New Watch

When I was fourteen years old I received my first high quality watch.  Before that, I only had watches that couldn't even last as long as the battery.  But how I received it was kind of an interesting story.  My Father and my birthdays are close together.  My Mother decided to gift him with a watch for his birthday.  She had found a great deal on a Mathey Tissot watch at our local Sears Outlet store.

Dad, however, already had a watch he liked quite a bit.  Since I was in need of a watch, it was handed over to me for my fourteenth birthday.  I was more than happy to have a decent watch.  So I ended up wearing it for the next twenty-nine years.


During the time I've owned this Mathey Tissot watch I've had about five watch bands for it, as well as, a number of batteries.  Ten years ago I opened a refrigerator at a convenience store, and the door handle caught the crown of my watch.  It ripped it completely out.  It cost quite a bit to get it repaired, but I paid the price to bring it back to life.  Unfortunately, the new crown wasn't a perfect fit.  My watch was always hard to adjust after that.

Another time I cracked the crystal.  So once again, I paid the price to have it replaced/repaired.  I'll admit, I'm a bit rough on the crystal.  The last few years I've used my workshop buffer to buff it out.  Which works a lot better (and quicker) than I thought it would.  I've ended up buffing it out quite a bit.  It's great that I can buff it at home so I don't have to pay someone to do it.

A few weeks ago the replacement crown broke.  Once again, I was trying to adjust my watch, and the head of the crown just came off.  This time I knew my watch needed to be retired.  Unfortunately, I knew it would cost a lot more to repair this watch than it would cost to buy another one.

So it was time for a new watch.  Or at least, a moderately well priced used one.  At least I knew where to start.  My Mathey Tissot watch had worked so well for me that I decided to look for another one.  Luckily, that is what E-Bay is for.

And lucky I was.  There were quite a few watches for me to choose from.  Mathey Tissot makes a few high end watch models, as well as, a few more affordable models.  I focused on the used, more affordable models.  I picked three watches for my "cutdown" list.  But one watch stood out from the three, and I bought it.


I have to say, I love it.  It looks even better in person than it does in the photos.  I might end up replacing the watch band, as I don't care for the kind that it came with it.  Otherwise, it's exactly what I was hoping for in a watch.  Secretly, I am hoping that I can get twenty-nine years out of this Mattey Tissot watch.  It could happen.  Although, I have to make sure not to rip out the crown again.

Wednesday, November 20, 2019

The Failing Victory of Upgrading My Cello: A Long and Ridiculous Story

If you've read through my blog you've seen all the posts about repairing guitars and other musical instruments.  I think it got to my head.  I've had a lot of success repairing, building, and modifying guitars and fretted musical instruments.  I thought, "Well, I can upgrade my cello the same way.  There are lots of luthiers who work on both guitars and the violin family of instruments."

Well, it turns out, I am not one of them.  I had so many things go wrong while working on this cello it will make you cringe.  It makes me cringe.  So I will tell my tale of woe.  Just know that it's not all bad.  I did end up putting my cello back together.


So here was the plan.  I wanted to upgrade my tailpiece and change my wooden peg tuners to metal gear tuners.  Step one was purchasing a harp style tailpiece, gold fine tuners, and a tailpiece cord.  All of it looked great out of the box.  That is, until I tried to put them together.  The tailpiece had a decorative ridge on it that the fine tuners couldn't fit around.  So I ended up sanding down the tailpiece with a sander.  In a bit of stupid luck, it ended up working out great.

While violin family basses (officially called a double bass) come standard with metal tuners, cellos do not.  It was all but impossible to find metal cello tuners made in the same style as basses.  There are other metal tuners that are disguised as wooden tuners, but that's not what I was after.  I wanted the metal looking ones.

It seemed that in all the world there was just one seller that sold them.  I was able to find him on E-Bay.  I bought a set, and if you look below, you can see the problem with them.


They don't come anywhere near fitting the peghole spacing.  So I e-mailed the seller about returning them.  He made me an offer for a discounted set of tuners that were four individual tuners instead of one solid piece per side.  So I went ahead and ordered them.


However, things took a turn for the weird as I was called away during the summer.  So I didn't have the chance to work on the cello for almost four months.  When I got back I decided the next thing to do was install the four individual tuners.  This is where I had numerous problems.

I had to ream out the pegholes to fit the tuners, only to find out the tuners were not made at an angle.  If you look at the scroll of the cello headstock you'll notice it narrows down.  The tuners were made at a 90 degree angle.


So I ended up filling in the pegholes so as to re-drill them.


Do you notice a problem?  If you do I wish I had you beside me when I screwed up.  I filled the wrong holes.  The tuners are staggered the other way.  I put the cello away for the day so I could calm down.  The next day I ended up filling up all the holes.


After I had let the glue dry for 48 hours I ended up re-drilling all of the pegholes so that the tuners would sit at a correct angle.  I then dry fitted all of them.


The screws they sent me were completely abysmal.  I tried one, and said, "Nope."  I immediately went to Ace Hardware and bought two sets of screws.  Both were the same size, but one was brass colored and the other standard steel metal color.  Luckily the brass colored ones were strong, and I had no problems with them.


Before I installed the tuners I took a wood dye pen, and colored the reamed wood.  That way, it was all the same color.  Everything looked as good as it was going to get, so I carefully installed the tuning pegs.


It looked alright, but the job was still far from finished.  During all this work my soundpost ended up getting knocked down.  I said "To heck with it," and had Luthier John Importuno install it correctly.  He was really cool about the entire thing.  But even he admitted, "He hated those metal tuners."  I understand.  Every musician has their own style with likes and dislikes.

So now that the soundpost was back up it was time to tune up the cello.  I brought it home, and started tuning it up.  This should be the end, right?  Nope.  The brand new tailpiece cord that goes around the endpin snapped.  My tailpiece, strings, and bridge all came crumbling down.  I ordered a newer, stronger cord.  Mercifully, the seller shipped it quickly.

So I put it all back together again.  I had a problem with the "D" string tuner.  It would turn forward, but wouldn't turn backwards when I was trying to tune.  There was one spot in the gear that was a little rough.  I eventually got it to catch, and then I was able to retune.

So finally!  Finally I was able to get my cello back together after it being in pieces for almost seven months.


So how did it sound?  Well, like I needed new strings on it.  I looked at the strings when I was putting it back together and saw how worn they were.  Then it occurred to me just how old they were.  Do you know what a good set of cello strings cost?  The ones I like are $140.  Yeah.  Not kidding.  So I'll hold off on buying those for a while.

But overall, the cello sounded pretty good.  I was able to play it for about 20 minutes.  I'm still an okay player.  Not great, but I can have a bit of fun with it.  I broke my right hand last year, and it makes it difficult for me to hold my bow.  I can only play for a few minutes straight before I have to take a break.

If had to do it all over again, I would go back in time, and try to warn myself.  You know, like in Sci-Fi movies.  I'd tell myself, "It just ain't worth it."  Even if my cello looks somewhat steampunk now.  Of course, if I wanted it to have a steampunk look, I'd just play it with goggles on.  But I digress.

Just remember this kids, if you have an idea of upgrading your orchestral instrument, talk it over with a professional luthier first.  They have contacts with dealers/suppliers that you are not aware of.  They can determine a better long term plan for your instrument.  But just remember the first thing I tell all players, "Have fun with it."  And I should have heeded my own advice.