Showing posts with label tele. Show all posts

Monday, September 3, 2018

Tele Trouble

I couldn't deny it.  I had G.A.S.  AKA Guitar Acquisition Syndrome.  For over a year I had been looking, nay, lusting at the XGP parts from Guitar Fetish.

 https://www.guitarfetish.com/BEST-QUALITY-XGP-Pro-Necks-and-Bodies_c_517.html

Despite having quite an arsenal of guitars I did not have a Telecaster or Tele style guitar.  Instead of buying one off the rack, I wanted something a little different.  So I bought 95% the parts I wanted off of Guitar Fetish.  Namely the XGP Amber Arched Tele Body and the XGP Tele style neck with rosewood fingerboard and angled neck.

Now comes my screw-up.  I usually take photos of the build process, but I completely forgot.  The good news, is that, it was pretty unremarkable.  The only problem was that the GFS 3 way switch was DOA.  I ended up going to Sam Ash to buy a Fender switch, and it worked just fine.

So here are the "after" photos of the guitar.


Did you notice something a bit different?  Did you notice that neck pickup?  I tried a standard Tele neck pickup, but I just couldn't bond with it.  I considered many options, but decided on routing out the neck pickup slot for a standard humbucker.

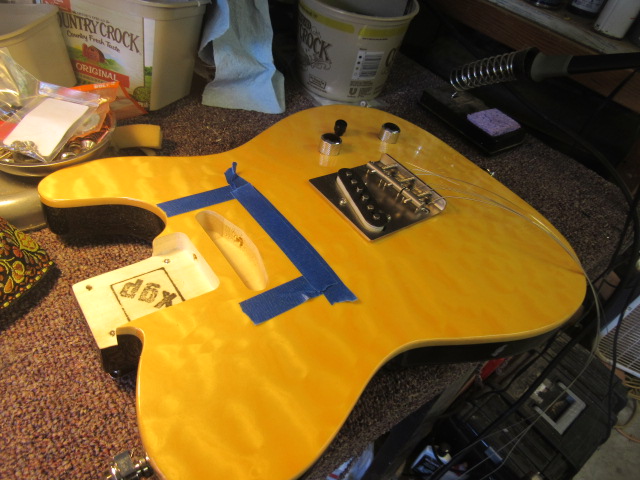


I know they say to measure twice cut once, but very luthier I know measures fifty times, and continues to measure as they cut.  I'm no different.  Since I am dealing with measurements as close as 1/128th of an inch, it pays to be as exact as I can.

I used a Dremel and my mini-router converter to slowly cut away the wood.  I know it doesn't seem like a big deal, just cutting away wood, but it pays to work slowly and carefully.  So this step took a fair amount of time.


I have to say, that's pretty awesome for a hand route.  Next up was installing the pickup.


If the pickup looks crooked, it's because I don't have the holding screws in it yet.  Now comes the part where I am mad at myself for not taking an "after" photo.  But know that I put the neck back on and lightly strung up the strings so I could line up the pickup.  It came out perfectly.
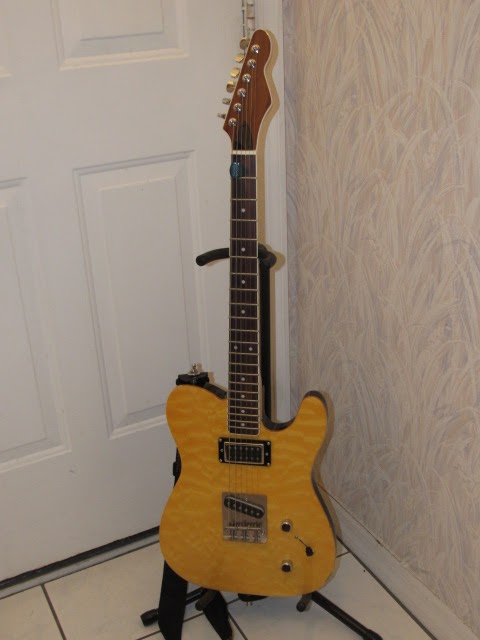
I went back and forth deciding on what pickups I should use.  I was pretty set on the bridge pickup.  I decided on the GFS 63 Overwound Tele Bridge Pickup.  It clocks in at 7.8K ohms.

The original neck pickup was a Cali Guitar V50 Tele 1 neck pickup.  However, it was very weak compared to the overwound GFS pickup.  Instead of buying a humbucker that kinda/sorta sounded like what I would want, I went to my parts drawer, and pulled out a Schaller Golden 50 neck pickup.  As you can see I installed a "half cover" on the Schaller pickup.

Once I plugged in the sound was perfect.  It was one of the most balanced pickup sets I've ever played.  It also had that bite I really wanted.  I think Billy Gibbons would dig this guitar.  Although, not everything was up to my liking.

The XGP neck was more than a little thick.  Since most folks have played a Gibson Les Paul at one of the big box stores, I'll compare it to that.  You know how a Gibson has a pretty thick neck?  Well, this was thicker than that.  It was also wider.  Even though I am used to playing Dean guitars, this neck was even thicker and wider than them as well.

So I am not happy with the neck at all.  I'm honestly thinking about changing it.  That, of course, is when I have the money to do so.  Guitaring doesn't come cheap.  So I might have a "Part 2" for this post in the future.  But for the time being I am not going to put a new neck on it just yet.  I'm having fun with it as it is, and that's what's most important.

Saturday, October 6, 2012

Guitar Project #7, The Rosewood Telecaster, Part 3

For Part 1:  http://angjellockheart.blogspot.com/2012/05/guitar-project-7-rosewood-telecaster.html

For Part 2:  http://angjellockheart.blogspot.com/2012/05/guitar-project-7-rosewood-telecaster_26.html

So to make a long story short, I finally completed the Rosewood Telecaster.  I'll explain how I did it while posting pictures of my work.

First off, here's the body after routing and shaping.  I got it nice and sanded down.


Next I used Z-poxy to fill the grain.  This really helped one place on the back that had a hallow place in it.


Then I sanded down the Z-poxy.  Sidenote:  It really sands down nicely.


Then I put on the Tru Oil.


After sanding and buffing I had this:


Next, it was time to assemble the guitar. 


I had to use a different bridge pickup than I would have liked, but I will change this one out later.


Here's the shot of the back.


Overall not too bad.  There's a couple of places that I could have done better.  I am going to change the one pickup out when I have the chance/money.  Oh, I also need a strap as I have locking tuners.  So it's playable, but not completely done yet.  But I guess it's close enough for jazz.

Saturday, May 26, 2012

Guitar Project #7, The Rosewood Telecaster, Part 2

Here is Part 1:  http://angjellockheart.blogspot.com/2012/05/guitar-project-7-rosewood-telecaster.html

Today was a perfect Saturday afternoon for woodworking.  I was actually working on two Telecasters, but I will only talk about the rosewood one in the post.

First off, I had a few things I wanted to accomplish.  I'll show the photo first, and way what I did to it.


First up, I routed out the neck pocket perfectly.  I am getting much better than I was.  I also cleaned up the pickup and cavity routes.

Next, I took the bandsaw, and cut the rest of the body into shape.  It reminds me of a very early piece of advice I got when I started my luthier training.  Cut the neck pocket first, then cut out the rest of the body.


Next, I cleaned up the neck pocket, and added the screw holes.

Mostly, I sanded the crap out of this thing.  Man, I thought maple was hard.  This rosewood ranks right up there with it.  I am so thankful for my spindal sander.  It helps with 90 degree sanding, and I don't know what I ever did before I had one.


This has me worried.  I was originally happy with this being a one piece block of rosewood.  However, this is a calcium deposit that is running right down the middle of the tree.  I have a feeling that I am going to have to fill it in with CA glue mixed with rosewood dust.


I wanted to get an idea of what this body would look like once I put a finish on it.  The easy way to do that is to wet the wood.  It also gives me an idea if I would want to darken the wood, or leave it the way it is.

My next step is do keep sanding.  I can't really do much more than that until I order parts for it.  So far I am pretty happy with it.

Thursday, May 24, 2012

Guitar Project #7, The Rosewood Telecaster

So I'm back in the workshop.  As I am finishing up one Telecaster I am starting another.  I think it was more luck that determined my choice of wood than brains.  I inherited a huge piece of Rosewood.  It was big enough to make a Telecaster body out of it without having to glue pieces together.  It was a rare piece of wood that is the perfect size for a guitar body.

Back in 1968 (I believe) Fender made an all Rosewood Telecaster for The Beatles George Harrison.  He used that guitar on the last few Beatles' albums, as well as his solo album, All Things Must Pass.  It had a very distinctive sound to it.


So I knew that this would be the perfect project for me.  Here's a picture where I have just started the rough cutting.


I then laid out the cutting line for the neck pocket, pickups, and control cavity.  I put a few forester bit cuts in the cavities so the router bits could get started.


In this picture, you can see where I have used a mini-router/dremel to route out the cavities.  It may take longer, but I have better control over what I am doing, and where I am cutting.


Next is the view of the back of the guitar.


I am worried about a place right in the middle of the guitar.  If you look (side to side, middle) at the back, you can see what looks like a crack.  It's where the middle of the tree was.  It's a calcium deposit.  I will probably have to fill and glue it up.

I did a bit of sanding on the back, and boy, is this rosewood hard.  It's also heavy too.  I'm betting this guitar will have a weight balance similar to a Paul Reed Smith.  In other words, a very heavy body, but the overall balance will be nice.

More to come when work continues on it.

Saturday, March 31, 2012

The Ongoing Baritone/ Tele/ Cello Project, Part 7


The original post, http://angjellockheart.blogspot.com/2011/03/baritone-cello-guitar.html

Part 1, http://angjellockheart.blogspot.com/2011/05/ongoing-baritone-cello-tele-project.html

Part 2, http://angjellockheart.blogspot.com/2011/05/ongoing-baritone-tele-cello-project.html

Part 3, http://angjellockheart.blogspot.com/2011/05/ongoing-baritone-tele-cello-project_29.html

Part 4, http://angjellockheart.blogspot.com/2012/02/ongoing-baritone-tele-cello-project.html

Part 5, http://angjellockheart.blogspot.com/2012/02/ongoing-baritone-tele-cello-project_24.html

Part 6, http://angjellockheart.blogspot.com/2012/03/ongoing-baritone-tele-cello-project.html


So here's where I am so far.  I am close.  Oh so close to finishing this project.  Let's go to the pictures.

In the picture below you can see that I have completed putting the lacquer on the body.  I have then sanded and buffed it out.


Here I am laying the hardware out.


Here I have the pickups put in, and now I need to wire them up.


Of all the weird things, I actually got the wiring correct the first time.  I have it plugged in, and all the electronics work.  


Here's another shot of the body with all the hardware hooked up.


Here, the neck is dry fitted in the neck pocket.


Now comes the fun part.  I realize that I have made a mistake.  The neck pocket is too far to the right for some reason.  I have no idea how that happened.  I can't just throw this project away.  I will have to find a way to do some "creative routing," and fix my screw up.  This is too nice of a project to give up now.  

So hopefully my next post in this series will be how I saved the day, and now have a cool, new guitar.

Friday, February 24, 2012

The Ongoing Baritone/ Tele/ Cello Project, Part 5

The original post, http://angjellockheart.blogspot.com/2011/03/baritone-cello-guitar.html

Part 1, http://angjellockheart.blogspot.com/2011/05/ongoing-baritone-cello-tele-project.html

Part 2, http://angjellockheart.blogspot.com/2011/05/ongoing-baritone-tele-cello-project.html

Part 3, http://angjellockheart.blogspot.com/2011/05/ongoing-baritone-tele-cello-project_29.html
Part 4, http://angjellockheart.blogspot.com/2012/02/ongoing-baritone-tele-cello-project.html


It's always nice to have a little help from your friends, or in this case, your Dad.  Basically, I had a very small place to route out on the guitar body, and it had to be accurate.  I knew it was going to take ten times longer to set up the equipment than it would be to actually make the cut.  So I was thankful to have an extra set of hands (my Dad) to help me with this.

Here's where I was at last time:


I needed to route out the neck pocket, and finish shaping the body.

After a bit of work, this is how it turned out.


Not bad right?


Yeah, I can definately live this that.  But then, I needed to check the fit of the neck pocket.


Ok, things are looking up.  I did have to do a little work on the neck pocket to get a perfect fit, but I did that just fine.  I think it needs a little more sanding, but after that, it's off to get stained and finished.  Stay tuned for that blog post.  I don't know how long it will take, but I am going to send it out to someone who actually has a spray booth.  I want someone who can actually make it look professional, as I am terrible with guitar finishing. 


Thursday, February 23, 2012

The Ongoing Baritone/ Tele/ Cello Project, Part 4, Not So Baritone

The original post, http://angjellockheart.blogspot.com/2011/03/baritone-cello-guitar.html

Part 1, http://angjellockheart.blogspot.com/2011/05/ongoing-baritone-cello-tele-project.html

Part 2, http://angjellockheart.blogspot.com/2011/05/ongoing-baritone-tele-cello-project.html

Part 3, http://angjellockheart.blogspot.com/2011/05/ongoing-baritone-tele-cello-project_29.html

So I've had a little change of heart/ design when it comes to the Tele project.  Frankly, I can't get a good baritone neck at a decent price, so I got a regular Tele neck.  I got it from the same place that Fender gets their higher end Squier series, from Hong Kong. 

I've found a nice little place where I can order things straight from the Hong Kong factories.

http://www.eyguitarmusic.com/

I have been really happy with what I have ordered.  I am getting the same stuff I would normally get from other places, I'm just cutting out two middlemen, and two trips of shipping.

Here's the pictures of the neck.


I also got the last pieces to complete the build.


You wouldn't believe how hard it has been to find an output jack.  I've been to just about every store in the bay area, and can't find one.  It's bordering on ridulousness.  But, this place has all the output jacks I want to buy.

And one other thing...


A double bladed hot rodded bridge pickup.  I have a thing for double bladed pickups, and this one is right up my alley.  And if I hate it, I have another Kent Armstrong pickup that I can replace it with.

My next step is to route out the neck.  Here's a picture for clarity.


The body is basically complete except for routing out the neck pocket.  So, I am going to do that in the near future, and post another blog when my wood work is hopefully complete.