Monday, September 3, 2018

Tele Trouble

I couldn't deny it.  I had G.A.S.  AKA Guitar Acquisition Syndrome.  For over a year I had been looking, nay, lusting at the XGP parts from Guitar Fetish.

 https://www.guitarfetish.com/BEST-QUALITY-XGP-Pro-Necks-and-Bodies_c_517.html

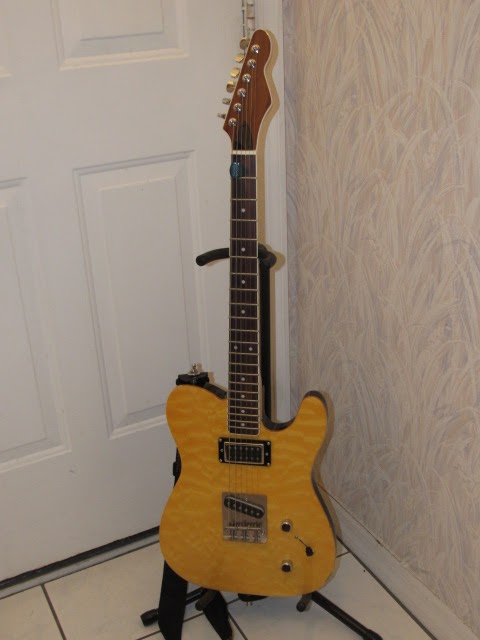
Despite having quite an arsenal of guitars I did not have a Telecaster or Tele style guitar.  Instead of buying one off the rack, I wanted something a little different.  So I bought 95% the parts I wanted off of Guitar Fetish.  Namely the XGP Amber Arched Tele Body and the XGP Tele style neck with rosewood fingerboard and angled neck.

Now comes my screw-up.  I usually take photos of the build process, but I completely forgot.  The good news, is that, it was pretty unremarkable.  The only problem was that the GFS 3 way switch was DOA.  I ended up going to Sam Ash to buy a Fender switch, and it worked just fine.

So here are the "after" photos of the guitar.


Did you notice something a bit different?  Did you notice that neck pickup?  I tried a standard Tele neck pickup, but I just couldn't bond with it.  I considered many options, but decided on routing out the neck pickup slot for a standard humbucker.

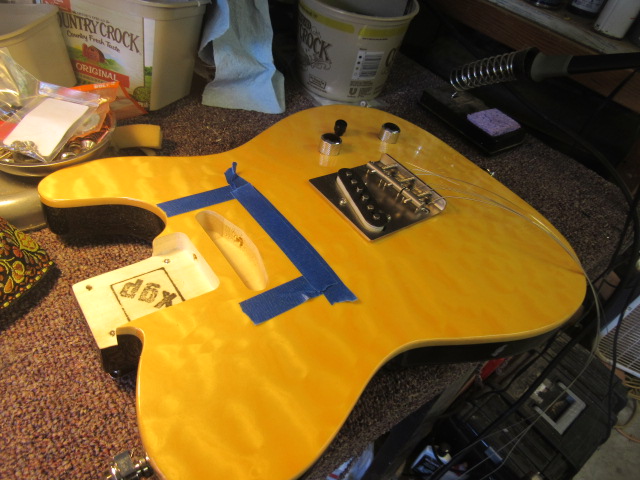


I know they say to measure twice cut once, but very luthier I know measures fifty times, and continues to measure as they cut.  I'm no different.  Since I am dealing with measurements as close as 1/128th of an inch, it pays to be as exact as I can.

I used a Dremel and my mini-router converter to slowly cut away the wood.  I know it doesn't seem like a big deal, just cutting away wood, but it pays to work slowly and carefully.  So this step took a fair amount of time.


I have to say, that's pretty awesome for a hand route.  Next up was installing the pickup.


If the pickup looks crooked, it's because I don't have the holding screws in it yet.  Now comes the part where I am mad at myself for not taking an "after" photo.  But know that I put the neck back on and lightly strung up the strings so I could line up the pickup.  It came out perfectly.
I went back and forth deciding on what pickups I should use.  I was pretty set on the bridge pickup.  I decided on the GFS 63 Overwound Tele Bridge Pickup.  It clocks in at 7.8K ohms.

The original neck pickup was a Cali Guitar V50 Tele 1 neck pickup.  However, it was very weak compared to the overwound GFS pickup.  Instead of buying a humbucker that kinda/sorta sounded like what I would want, I went to my parts drawer, and pulled out a Schaller Golden 50 neck pickup.  As you can see I installed a "half cover" on the Schaller pickup.

Once I plugged in the sound was perfect.  It was one of the most balanced pickup sets I've ever played.  It also had that bite I really wanted.  I think Billy Gibbons would dig this guitar.  Although, not everything was up to my liking.

The XGP neck was more than a little thick.  Since most folks have played a Gibson Les Paul at one of the big box stores, I'll compare it to that.  You know how a Gibson has a pretty thick neck?  Well, this was thicker than that.  It was also wider.  Even though I am used to playing Dean guitars, this neck was even thicker and wider than them as well.

So I am not happy with the neck at all.  I'm honestly thinking about changing it.  That, of course, is when I have the money to do so.  Guitaring doesn't come cheap.  So I might have a "Part 2" for this post in the future.  But for the time being I am not going to put a new neck on it just yet.  I'm having fun with it as it is, and that's what's most important.

Friday, August 24, 2018

Hunting Trailer Day: Time To Install A New A/C Unit

Last November a new (used) hunting/camping trailer was bought by our little hunting group.  Here's the original blog post that explains everything.

http://angjellockheart.blogspot.com/2017/11/new-huntingcamping-trailer-day-its.html

When we bought it we knew there were a few things that we needed to repair.  First up, the trailer lights weren't working at all.  I won't go into it, but let's just say it took a while to repair.  The good news, is that, the lights are now working.  That means all the lights; running lights, brakes lights, and turn signals.

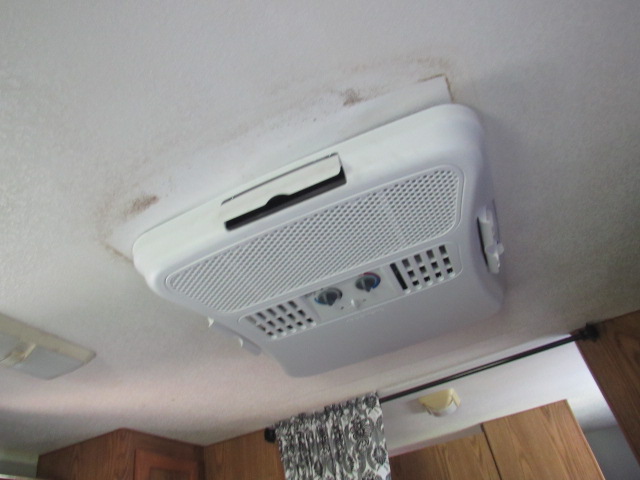
After we had bought the trailer I took a closer look at the A/C unit.  There was no doubt about it, the entire thing needed replaced.  The whole unit was corroded and coming apart.  I didn't even dream about trying to repair small parts on the unit to get it working.  I didn't see anything worth saving.

But I had to remember that the A/C unit was over twenty years old at that point.  A/C units are usually good for about ten years.  So that just confirmed that the entire unit needed replaced.

Frankly, it was also cheaper and easier just to buy a whole unit.  So Dad scoured the internet for the perfect A/C unit.  He found one that came highly recommended and the price was right.  It shipped from Texas to Florida in only three days.  That surprised even me.

Now came the fun part, installing it.  I won't go into huge details like I normally do.  I don't know if anyone should follow what we did as a guide.  I would recommend YouTube.  It has a lot of quality videos on how to install one.

The first thing was to take the interior panel apart, and remove the bolts.  Three came out fine, but of course one just had to be a pain in the butt.  Dad ended up cutting it loose with a grinder.  I highly recommend doing that.  Once the bolts were cut loose it was basically picking the thing up and throwing it off the roof.

Here's Dad and his belly thinking on things.


Luckily he's a lot lighter than I am, and the roof is metal.  This was just after he shoved the old A/C unit off the roof.


As you can see it looked exactly like I said it did.  Next up we cleaned up the hole where the unit sat.


Now about this time it was starting to get hot.  As in, Florida hot.  Before noon it wasn't too bad, but once it got past 12 PM it was downright miserable.  Most of our time we spent on this project was spent on breaks.  As in, resting and drinking a ton of water.  During the hours I spent working on this project I ended up drinking over a gallon of water.  

Once we cleaned the roof and hole off we took the new A/C unit out of the box.  We actually read the directions.  We made a (somewhat) smart plan on how to put the new unit on the roof.  One of our ladders was pretty long.  So we put it at an angle and just shoved the unit up the ladder.  Dad was on one ladder and I was on another beside that one.  In the end we managed to get the unit up on the roof, and then took another break.  


The next thing was to line up the A/C unit on the roof hole.  It sounds easy, and I can't say that it's too hard of a thing to do, but it really is time consuming.  Well, it is if you want to do it right.

So the new bolts went in, and the new parts for the underside were installed.  Again, it wasn't hard, it was just time consuming.  Especially when you consider how many water breaks we were taking.  


The next part was to connect the (optional) heat strips and the wiring.  Most of the wiring was just pushing a plug into it's receptacle.  Again, not hard, I just had to see which end went up.  Next we screwed the cover on.


Great news!  We plugged it in, and it worked the first time.  What I liked was that it was immediately cold.  It wasn't one of those units where you have to let it run fifteen minutes, and then it thinks about cooling.  No, it was immediately cold.  Needless to say we were really happy with it.  

Here's what the unit looked like (from the outside) installed.


Not bad for six (grumble, grumble) hours worth of work.  If I had to do it all over again... I totally would.  Have you ever tried to stay in a camper without A/C when it's 95 degrees with 100% humidity?  Like me winning the lottery it just ain't happening.  

Hopefully this unit will last for a long time.  Namely, because I don't want to do all that work again.  But if I do, I'm certainly going to do it sometime other than summer in Florida.  

Tuesday, August 21, 2018

Get Cha' Pull,... This Floyd Rose Right Off Of This Guitar, Part 2

Here are the previous posts about this guitar so you know what I'm talking about.

Get Cha' Pull:  New Guitar Day: Dixie Rebel

http://angjellockheart.blogspot.com/2017/08/get-cha-pull-new-guitar-day-dixie-rebel.html

Get Cha' Pull,... This Floyd Rose Right Off Of This Guitar

http://angjellockheart.blogspot.com/2018/07/get-cha-pull-this-floyd-rose-right-off.html


So here's where I was at with the Dean Dixie Rebel.  I managed to install the new Floyd Rose Tremolo on the Dean, but I wasn't happy with how it stuck out the back of the guitar.


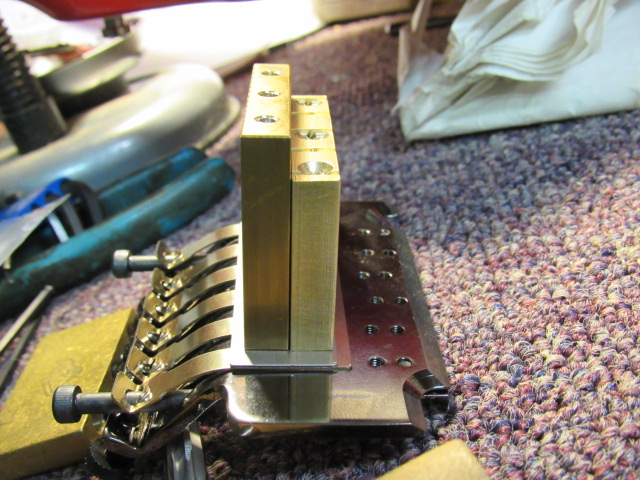
After some reading on the web, I decided to change the brass block.  (That piece you see sticking out the back in the photo above.)  Everyone tends to sell these giant brass blocks for more sustain, tone, etc.  But I needed a smaller one.  

This lead to a series of really irritating mistakes.  I'll try to explain the best and shortest way I can.

First, I took apart my Gotoh Floyd Rose.  It seems they put extremely cheap screws in it, and I stripped out one of them.  I'm sure they used Lock-Tite on all of them.  I had to use all sorts of tools to get the stupid thing out, but with a drill, extractor, help from my Father, another drill, and an hour of working on it, I finally managed to get the stripped screw out without damaging the Floyd Rose.


I then ordered the smallest brass block I could find.  What I didn't count on was that the outside holes were 1mm off.  That doesn't sound like much, but metal isn't forgiving.  Also, it took 4M screws instead of 3M screws.  

So I searched the web and found a shorter brass block for the Gotoh (through Philadelphia Luthier.)  It wasn't as short as I wanted (33MM) but it was the shortest I could find for the Gotoh.  

Here you can see the difference between them.


I know some folks say to just cut the brass block, but I don't have that kind of metal machinery.  I'm also scared of screwing this up more than I already have.  But I managed to change them out without too many problems.

Here I am trying to keep all my brass blocks straight.


The original one still has a piece of screw stuck in it.


After a little finagling I was able to put the Floyd Rose back on.


But this lead to a problem I've never had.  The springs kept popping out of the brass block.  I've never had to use screws to hold one down, but it looked like I was going to have to do just that.  So back to Ace Hardware for more screws.


The good news, is that, it managed to hold the springs down.  But now it came down to, "Did all this work pan out?"  Kinda.


If I wasn't using the Floyd, it would stay behind the back plate.  If I used the Floyd, it still stuck out the back.  If I didn't have the screws in there I would be close.  But for now I'm going to have to play it without a cover on the back.  But at least it plays pretty good.  And I can still do all those Dimebag squeelies.   

Friday, August 3, 2018

Laser Eyes!

I have needed corrective lenses to see correctly since I was nine years old.  As I have gotten older my vision has become even worse.  Let's be honest, my vision sucked back then, and has really sucked these last ten years.  I wore contacts for a long time, but gave them up in 2006.  I still wasn't happy having to wear glasses if I wanted to see anything that was more than six inches from my nose.  So in 2006 I started looking into LASIK.

You know all those, "Get LASIK now for $250 advertisements?"  Yeah, I don't know anyone who would qualify for those.  Back in 2006 the estimated cost for having the procedure on both eyes was around a total of $5,000.  There was no way I could swing that back then, so I never thought about having the procedure done until recently.

Lately I have become more financially stable, so I visited a doctor affiliated with Lasik Plus+ to see if I still qualified for LASIK.  Long story short, yes I did.  So after talking to the financial side of Lasik Plus+, I found that the prices had come down quite a bit from over a decade ago.  We agreed on a price, so it was time for me to receive, "LAZER EYEZ!"


Now here is the official version of how LASIK works.


But I'm going to tell you what happened to me.  First, they give you a valium to calm your nerves.  I'm someone who strongly reacts to medication so I was worried about taking 1 MG of valium, and having it mix with my other medications.  The doctor said there would be no interference.  So I took the valium, and... I got dizzy.  

No, I did not calm down like I was supposed to.  I just got dizzy.  It didn't really take the edge off.  In fact, it didn't do anything other than like I said before, make me dizzy.  I guess I'm used to stronger stuff like, I don't know, Benadryl.  


The next thing they do is put numbing drops in your eyes.  Again, I really think they should have doubled up on the numbing drops because while it made my eyes feel funny, it didn't really numb them that much.  If the machine is going to be drilling into my eyeballs with a laser I really think I should at least be afforded some really strong numbing eye drops.  

So I always wondered how they kept a person's eyelids open during surgery.  Remember the movie, "A Clockwork Orange?"  Yeah, it's exactly like that.  It's also as painful as it looks.


Next, the machine vacuum sucks your eyeball to get a grip on it.  Believe me, with the grip the machine has on your eyeball, your eyeball isn't going anywhere.  And yes, it hurts as bad as you think it will.  

Luckily the procedure doesn't take long.  They like to say, "You'll be seeing halos for a while."  What they mean is everything looks like it has a milky finish on it.  If you imagine life like a photograph, look at that photograph and pour milk over it.  That's what everything looks like. 

Note:  It does get better over time.  Certain things like TV, smartphone, and computer screens are tough to look at for a while.  Just remember to constantly use your eyedrops like you're told to.

After the procedure they recommend sleep.  They say, "There will be discomfort."  What they mean is it will hurt way too much to even open your eyes.  I came home, and slept for six hours straight.  After that I felt much better.  The worst of the pain is in the first four hours.

Note:  When they say you will need someone to drive you to and from your appointment they are not kidding.  Again, I couldn't even open my eyes.

But they do give you some nice looking 80's sunglasses sit tight against your skin.  That way it keeps out a lot of light.  They look kind of like this.


The one thing they didn't tell me about was "bruising."  Okay, they did mention there "might" be some.  What they didn't say was that it was going to look more like this.


It's been a week, and I still have bruising on both eyeballs.  It will go away eventually.  I just wish I had known a little more about it than I was told.  

The other story about my bad eyesight was this, I knew I needed reading glasses even before LASIK.  Now, I really need them to see anything up close.  So, I've done away with my regular frames, and have upgraded (downgraded?) to old man reading glasses.


Overall I am happy I had the procedure.  I suspect I'll be happier as my eyesight clears up.  I am seeing 20/20 our of both eyes, but everything is still somewhat milky.  Although it's not as bad as it was a few days ago.  I still keep trying to push my "not there" glasses up my nose.

My main goal in posting this blog post was to fill in some of the gaps of information potential patients would want to know.  So I hope this helps out a few folks.  Just remember two things.  It's going to hurt (they do call it surgery,) and see if they have a special on the lifetime LASIK plan.  


Sunday, July 29, 2018

The Worst Patient: Mr. Tough Guy

To completely understand this post, it may help to not only read one, but two of my previous posts.

This was written four months ago when I broke my hand.

http://angjellockheart.blogspot.com/2018/04/i-joined-fight-club.html

The following post I wrote eight years ago.  In it, I talk about how even at a young age I would not cry in front of a woman despite feeling pain.

http://angjellockheart.blogspot.com/2011/02/measure-of-man.html

Now, onto the beginning of my new blog post.

I am the worst patient.  Not because I complain.  No, it's because I do the opposite.  You see, I broke my hand four months ago.  Normally it would be healed by now, but because I carry a genetic disease, (Dupuytren's Contracture Syndrome) I needed to go to physio-therapy to straighten the muscles and soft tissue in my hand.
Here's the Wiki page on Dupuytren's.

https://en.wikipedia.org/wiki/Dupuytren%27s_contracture

So I've been going to physio-therapy once a week to straighten out the muscles and tissue in my hand.  The therapist I am seeing (I'll call her PT so as not to print her real name) is gorgeous.  She's so nice, has huge blonde curls, and a tiny nose ring.  I won't post a picture of her, but imagine something like this.


This leads to the guy problem of never admitting you're in pain in front of a woman.  Our conversation goes something like this:

(PT bends my pinky back.  It hurts pretty good since it doesn't want to bend that way.)

PT:  I'm not hurting you am I?

Adrian:  Nah, I'm doing great!

PT:  Because it looked like you winced with pain.

Adrian:  No, I just thought I had to sneeze.

PT:  Because it's not supposed to hurt.  If it hurts it's not going to help you.

Adrian:  It's a little bit uncomfortable, but I wouldn't describe it as pain.

PT:  Well, let's not have it be uncomfortable either.

Adrian:  Tis but a flesh wound!

PT:  What?

Adrian:  You've never seen, "Monty Python and the Holy Grail?"

PT:  No, what is that?

Adrian, Well, pull up a chair and let me tell you all about it.


Seriously, I haven't acted this dorky around a beautiful woman since... middle school?  Yeah, this is totally a middle school crush.


Before anyone gets mad and thinks I'm bothering this poor gal, please note.  I have not said anything wrong, sexist, impolite, or uncomfortable.  I have not hit on her, or asked her out.  She is taken, and I respect that.  Like I said, it's just a bit of a crush.  (Cue the 80's middle school crush music!)


This situation reminds me of the movie "Spartacus" (The 1960 film.)  There's a scene in it where Spartacus has been wounded by a blow from a sword, and he is slowly bleeding out.  One of the veteran fighters tells him he has to seal the wound.  

That being done by inserting a sword in the burning coals of a fire until it glows red with unforgiving heat.  Then applying the sword to the wound to cauterize it.  Of course, to do it properly the veteran fighter had to hold it on the wound for five continuous seconds.

I have been burnt by hot metal before.  It's a pain like no one can prepare you for.  But the veteran has a plan for Spartacus to hold still for that long.  Instead of having four gladiators hold Spartacus down, he has one woman do it.  

This, of course, brings up the question, "How could one woman do what four gladiators could not?"  It's because a man won't cry, or yell in pain in front of a woman.  As I wrote in the blog from many years ago, I wouldn't cry in front of a female technician/nurse when I was eight years old.  Now-a-days as an adult, I won't admit pain in front of yet another female technician.  

So I realize I am going to have to be a little more honest with PT.  I am going to have to let her know that sometimes she bends my pinky back a little too far.  Sometimes my hand is a bit more tired than I let on.  But I won't tell her about my crush.  That I will keep secret.  (Except for posting it on the internet like a dork.)


Saturday, July 21, 2018

All 80's Kids Dreaded... The Rappin' PSA

To this day I am still unnerved by it.  It was one of those things you knew were coming up in the commercial break, but could do nothing about.  The mute button hadn't been invented yet, you know.  That's right, it was the 80's Public Service Announcement.

And like a lot of commercials in the 80's they had a lot to say, but only 30 seconds to say it.  So they decided to "get with the times" and start rapping, err, rappin', about it.  I always dreaded when those PSA's would come on.  I know they were trying to be, "hip," but they were just embarrassing themselves.

Remember those G.I. Joe PSA's?  I must have seen every episode 200 times.  I knew every PSA by heart.  At least they didn't rap in those.


D.A.R.E. was always trying out things.  The best being the famous, "Your brain on drugs."  But for me, the snake man was just the best at being over the top.


Yes, this really aired.


Thank you D.A.R.E.


One of the worst... best?  Best of the worst?  Anyway, there was this one PSA called, "The Suicide Rap."  Of course, it should have more correctly been called, "The Anti-Suicide Rap."  I have looked for it, but can't find it.  I only saw it the one time, but it stuck in my mind.

I thought, "Oh no.  This is going to be bad."  And it was.  I didn't know what social anxiety was back then, but this gave it to me in bundles.

The lyrics were, (To the best of my recollection)

Your Mother, your Father,
Your Brother, Sister too.
Your teacher, preacher, councilor,
It don't matter who!

They were trying to say that you should talk to someone if you felt suicidal. The lyrics above were the chorus to it.  Why do I remember it after so many years?  Because the song was mostly chorus.  They really could have done a better job.  You know, write a few more lyrics?

Here's some of the great/terrible rappin' PSA's.


Never underestimate a deadline and a Casio keyboard.


Someone else had the same idea as me.  See, I'm not the only one who hated 80's PSA's.


Well at least I didn't have to worry about 80's PSA's once it flipped to 1990.  No, I then had to worry about 90's PSA's.  That, of course, deserves it's own blog post.

Saturday, July 14, 2018

Get Cha' Pull,... This Floyd Rose Right Off Of This Guitar

To understand this post a little better, here's the original post I wrote when I bought this guitar:


I like my Dean Dixie Rebel.  It's surprisingly lightweight, it has an awesome neck profile, and the pickups are awesome.  There is something that I really hate about it.  I don't like using the word, "hate," but I really hate the Floyd Rose tremolo that came on it.  I just can not keep the guitar in tune.

The Floyd Rose that comes standard on it is a "Licensed Floyd Rose" instead of a real one.  It also doesn't have a manufacturer's name on it, so that tells you how generic it is.  The one neat thing about the hardware on the Dixie Rebel is that, it comes in Black Chrome.  You don't see that very often.  


So I start searching the web about a replacement Floyd Rose.  I remember members of the Dean Guitars Forum saying how they really liked the Gotoh tremolos.  After searching Reverb.com I was lucky enough to stumble across a Gotoh Floyd Rose in "Cosmo Black."  I'm guessing "Black Chrome" is trademarked so they couldn't call it that.  But it was the same color.

I took a chance and ordered it, and this is what I received.


It's a perfect color match.  The kit came with posts, springs, and all the little parts.  Luckily, the Gotoh tremolo was a drop in replacement on the Dixie Rebel.  I didn't need to change out any of the other parts.  


There was one problem though.


The Dixie Rebel is a thin bodied guitar so the Floyd Rose stuck out the back too far.  I checked the Gotoh website, and found out they offer this Floyd Rose with smaller block.


So I'm kind of stuck with this for now.


Let me think about this for a bit.  I may get back to you in …. Part 2!!!!  But for the time being the guitar is pretty cool.  It stays in tune much better, and I can do all sorts of Dimebag squealies.