Showing posts with label trailer. Show all posts

Friday, August 24, 2018

Hunting Trailer Day: Time To Install A New A/C Unit

Last November a new (used) hunting/camping trailer was bought by our little hunting group.  Here's the original blog post that explains everything.

http://angjellockheart.blogspot.com/2017/11/new-huntingcamping-trailer-day-its.html

When we bought it we knew there were a few things that we needed to repair.  First up, the trailer lights weren't working at all.  I won't go into it, but let's just say it took a while to repair.  The good news, is that, the lights are now working.  That means all the lights; running lights, brakes lights, and turn signals.

After we had bought the trailer I took a closer look at the A/C unit.  There was no doubt about it, the entire thing needed replaced.  The whole unit was corroded and coming apart.  I didn't even dream about trying to repair small parts on the unit to get it working.  I didn't see anything worth saving.

But I had to remember that the A/C unit was over twenty years old at that point.  A/C units are usually good for about ten years.  So that just confirmed that the entire unit needed replaced.

Frankly, it was also cheaper and easier just to buy a whole unit.  So Dad scoured the internet for the perfect A/C unit.  He found one that came highly recommended and the price was right.  It shipped from Texas to Florida in only three days.  That surprised even me.

Now came the fun part, installing it.  I won't go into huge details like I normally do.  I don't know if anyone should follow what we did as a guide.  I would recommend YouTube.  It has a lot of quality videos on how to install one.

The first thing was to take the interior panel apart, and remove the bolts.  Three came out fine, but of course one just had to be a pain in the butt.  Dad ended up cutting it loose with a grinder.  I highly recommend doing that.  Once the bolts were cut loose it was basically picking the thing up and throwing it off the roof.

Here's Dad and his belly thinking on things.


Luckily he's a lot lighter than I am, and the roof is metal.  This was just after he shoved the old A/C unit off the roof.


As you can see it looked exactly like I said it did.  Next up we cleaned up the hole where the unit sat.


Now about this time it was starting to get hot.  As in, Florida hot.  Before noon it wasn't too bad, but once it got past 12 PM it was downright miserable.  Most of our time we spent on this project was spent on breaks.  As in, resting and drinking a ton of water.  During the hours I spent working on this project I ended up drinking over a gallon of water.  

Once we cleaned the roof and hole off we took the new A/C unit out of the box.  We actually read the directions.  We made a (somewhat) smart plan on how to put the new unit on the roof.  One of our ladders was pretty long.  So we put it at an angle and just shoved the unit up the ladder.  Dad was on one ladder and I was on another beside that one.  In the end we managed to get the unit up on the roof, and then took another break.  


The next thing was to line up the A/C unit on the roof hole.  It sounds easy, and I can't say that it's too hard of a thing to do, but it really is time consuming.  Well, it is if you want to do it right.

So the new bolts went in, and the new parts for the underside were installed.  Again, it wasn't hard, it was just time consuming.  Especially when you consider how many water breaks we were taking.  


The next part was to connect the (optional) heat strips and the wiring.  Most of the wiring was just pushing a plug into it's receptacle.  Again, not hard, I just had to see which end went up.  Next we screwed the cover on.
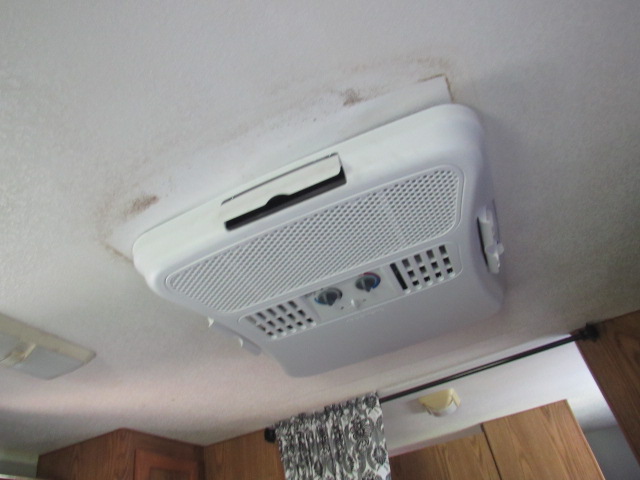


Great news!  We plugged it in, and it worked the first time.  What I liked was that it was immediately cold.  It wasn't one of those units where you have to let it run fifteen minutes, and then it thinks about cooling.  No, it was immediately cold.  Needless to say we were really happy with it.  

Here's what the unit looked like (from the outside) installed.


Not bad for six (grumble, grumble) hours worth of work.  If I had to do it all over again... I totally would.  Have you ever tried to stay in a camper without A/C when it's 95 degrees with 100% humidity?  Like me winning the lottery it just ain't happening.  

Hopefully this unit will last for a long time.  Namely, because I don't want to do all that work again.  But if I do, I'm certainly going to do it sometime other than summer in Florida.  

Thursday, November 30, 2017

New Hunting/Camping Trailer Day: It's About Time

All the way back in 1987 my Dad along with his friend John W. bought a 1966 17 ft. Shasta trailer.  It was worn, smelled like dog, and needed a ton of work.  But it only cost $500.  So, it was kind of a fair trade off.  Over the years we've repaired and added things like new refrigerators, A/C units, and a bunk bed.

But it's now been 30 years since it was bought and 51 years since the trailer was manufactured.  When we took it hunting earlier in November we discovered rotted wood, holes, metal that was crumpling.  Not to mention it's always been a bit small for three full sized men.  Basically, it was time to buy a new camper.

I had been looking at different types of campers for months.  Craigslist is a great place to look for them since it covers a wide area, and I could put in what I was looking for.  Namely, manufactured year and price.  I had seen a number of trailers that were great buys, but they sold before I could even call or see them in person.

The hard part in trying to buy a trailer was buying one that the three of us could agree on.  I wanted a longer one (27-29 feet long,) but Dad wanted a shorter one (20 feet long.)  One thing we had to be careful of was the weight.  Neither one of us could haul a heavy trailer.  The perfect trailer also had to have a layout in which the three of us wouldn't be tripping over each other.

So when I saw a 1996, 20 ft. long Mallard by Fleetwood trailer I knew I had to give it a look.  The pictures on it looked great.  I loved the layout in that, the three of us could easily sleep in it, and wouldn't be stepping on each other all the time.

Basically we drove to Zephyrhills, and looked at the trailer.  The seller had multiple people looking at it.  We looked it over, huddled, and agreed to make an offer.  We agreed to a price with the seller, and drove to our bank.  We ran into horrific traffic due to an accident, so it took a while to make it back, but we bought the trailer, and drove it home.

Let's go to the photos!!!


Here's the side view.


I like the number of windows.  Not too many, not too few.


Here's the side by side with the old trailer.


Here's the corner/side view.


When you walk through the door, the couch/bed is directly to the right.


As you sit on the couch you can see the table on the left (turns into a bed,) and kitchen on the right.  In the back left is the bathroom.  On the right are dual bunks.


Another nice thing about the trailer is how tall it is.  I was close to brushing my head on the top of the old Shasta trailer all the time.  I don't feel so cramped all the time in the Mallard by Fleetwood.

Here are the dual bunks in the back.  It will be perfect for our hunting buddy John W.  He can sleep in the bottom, and put all his stuff in the top.  He usually keeps his things in black garbage bags so that setup really works for him.

Now, the trailer will need some work.  The lights need repaired.  And we need to add tie-downs to the propane tanks and the propane cover.  There are always going to be "surprise" things that will be discovered, and need to be repaired.  But overall, there doesn't seem to be that much that needs repaired.  (Famous last words.)  If there is you can be sure that I will write a blog about it.

Thursday, May 12, 2016

The "New" Little Blue Trailer, Part 2

So the work has continued on the new, little blue trailer.  Now that it has come together, I can really say it reminds me of 1970's Spiderman colors.


So, here's what's happened since my last post about the trailer.  I put on the last coats of paint on the wood.  Dad's friend helped repair the metal frame.  Dad then sealed and painted the frame of the trailer.

Next, he then assembled the wood onto the frame.  So now it looks like this:


Not too bad eh?  One thing you have to say is that, you can see it coming down the road from quite a distance.  Hopefully now that it has been repaired it will last a while.  When Dad uses a trailer for hauling wood, he really uses it.  Namely, to the tune of 4,000 pounds at a time.  So, let's hope it lasts a while. 

Yes, let's hope that I won't have to write a "Part 3" for a while.  Or if I do, let it be because of upgrades, and not because another guy dropped a giant log on it.

Saturday, May 7, 2016

The "New" Little Blue Trailer, Part 1

Once upon a time, we had a little blue trailer for hauling wood and such.  But it wasn't big enough.  In fact, I wrote about it five years ago:

http://angjellockheart.blogspot.com/2011/04/little-blue-wagon.html

Here's a picture of it:


Notice the blue color?  Well that was kind of by accident.  I had white paint that I added a can of dark blue paint, and that's the color it gave me.  It was what we call a happy accident.  You see, that color blue almost glows at night.  So when we were driving down the road at night, the trailer could be seen from a half mile back. 

But Dad said the little blue trailer wasn't big enough.  He needed a trailer with dual tandems (a total set of four tires on it.)  That's right, it had to be super heavy duty.

So he bought one with dual tandems.  It was working well until a construction worker with a crane set a 4,000 pound log on it, and then pushed down with the crane.  So, it's now time to rehab, rebuild, and repaint the "new" little blue trailer.

Here's what we are dealing with:


Right now, the wood has been pulled off of it.  Namely, the wood was so banged and torn up that it needed replaced.  So here is the trailer stripped of wood, and the frame halfway painted.  It looks orange in the picture, but it is closer to Spiderman red. 

Here is the beam that was bent.  It is going to need replaced.  Hence, why it and part of the trailer have not been painted yet.


Here's the view from the back:


And here's the view from the side that still needs welded:


So this leads us to the wood.  Since the last blue worked so well, Dad decided he wanted to go with that same blue.  So we went to Home Depot, eyeballed the blue colors, and came up with the blue closest to what we had on the old blue trailer.


Heck if I can tell the difference between the two.  This time, we are doing it right.  The guy at Home Depot colored our primer the same as our paint.  So I am putting both primer and paint down on the wood.  Now, the wood on the upside will get torn up, but it will be protected from water damage on the underside. 

As of this moment I have the primer put on all the wood.  I am letting it dry until tomorrow when I will start adding the regular paint on it. 

So there is still a lot of work to do on it.

1.  Weld the trailer in a few spots.
2.  Replace the bent beam.
3.  Continue with the red paint after all the metalwork is complete.
4.  Continue painting the wood.
5.  Install the wood into the trailer. 
6.  Somewhere in there make sure all the trailer wires are off the ground and working.
7.  Once the wood is completely installed it will probably need another coat of paint.  Since the back of the trailer gets so dinged up, it 's good to have a thicker coat of paint there. 

I will post Part 2 in a week or so once most of the work is complete on the trailer.  Stay tuned!