To catch up on this ongoing story, read these blogs first.
Adrian: Amateur Gardener
http://angjellockheart.blogspot.com/2013/03/adrian-amateur-gardener.html
Part 2.
Adrian: Amateur Gardener, Part 2
http://angjellockheart.blogspot.com/2013/03/adrian-amateur-gardener-part-2.html
Adrian: Amateur Handyman
http://angjellockheart.blogspot.com/2013/04/adrian-amateur-handyman.html
Part 3.
Adrian: Amateur Gardener, Part 3
http://angjellockheart.blogspot.com/2013/05/adrian-amateur-gardener-part-3.html
Basically I wanted to do an update on all the plants that I planted for my girlfriend Lili (not her real name.) Here in Florida we are starting to get into our rainy season, and honestly, the rain has been coming down.
First up, the Coleus. When we first got them, they were maybe five inches high. With a little water they kind of grew.
Yeah, they got tall really quick. I mean, I didn't think Coleus got that tall. And I don't think they are done yet. There are some very small buds starting to pop up. I think I will be posting another blog about these Coleus in the future.
Next up are the Vinkas. They had a few buds on them, but again, with a little rain they have really taken off.
Even the donkey's ear is doing well. I think it needed to put down some deep roots first, but it has been steadily growing.
And the bromeliads always do well.
But look closer at that picture. Here, let me help.
They are starting to breed. And they are wanting to take over.... the flower bed.
More updates to come. Stay tuned.
I look at life a bit differently, and like to post my weird thoughts. I like musicial instrument repair and woodworking. For trying to live a somewhat normal life, a lot of weird things happen to me. Instead of putting up with it, I post about it in this blog.
Showing posts with label bromeliads. Show all posts
Sunday, June 16, 2013
Monday, May 13, 2013
Adrian: Amateur Gardener: Part 3
To catch up on this ongoing story, read these blogs first.
Adrian: Amateur Gardener
http://angjellockheart.blogspot.com/2013/03/adrian-amateur-gardener.html
Part 2. Adrian: Amateur Gardener, Part 2
http://angjellockheart.blogspot.com/2013/03/adrian-amateur-gardener-part-2.html
Adrian: Amateur Handyman
http://angjellockheart.blogspot.com/2013/04/adrian-amateur-handyman.html
In part one of this ongoing series I laid out the ideas I had for putting in a garden. In part two, I laid down the timbers, mulch, and bromeliads. In the Handyman blog, I did a lot, but as far as gardening, I planted some coleus and vinkas.
So now I want to update how the plants are doing. This is kind of my first time planting a garden, so I wanted to be very careful. Namely, I looked very closely at plants that could happily live in mostly shade. Those happened to be coleus, vinkas, and bromeliads. So how are they doing? Lets look!
The coleus is actually blooming! Once it got planted, and had a little bit of rain fall on it, all of them just started taking off.
All the vinkas started blooming really nicely as well.
The bromeliad's roots have really taken hold, and are doing really well.
And here's a shot of the bed on the left.
I'm sure there will be another installment of the "Amateur Gardener" series. I have a feeling I will be building two raised garden beds in the back. Stay tuned.
Adrian: Amateur Gardener
http://angjellockheart.blogspot.com/2013/03/adrian-amateur-gardener.html
Part 2. Adrian: Amateur Gardener, Part 2
http://angjellockheart.blogspot.com/2013/03/adrian-amateur-gardener-part-2.html
Adrian: Amateur Handyman
http://angjellockheart.blogspot.com/2013/04/adrian-amateur-handyman.html
In part one of this ongoing series I laid out the ideas I had for putting in a garden. In part two, I laid down the timbers, mulch, and bromeliads. In the Handyman blog, I did a lot, but as far as gardening, I planted some coleus and vinkas.
So now I want to update how the plants are doing. This is kind of my first time planting a garden, so I wanted to be very careful. Namely, I looked very closely at plants that could happily live in mostly shade. Those happened to be coleus, vinkas, and bromeliads. So how are they doing? Lets look!
The coleus is actually blooming! Once it got planted, and had a little bit of rain fall on it, all of them just started taking off.
All the vinkas started blooming really nicely as well.
The bromeliad's roots have really taken hold, and are doing really well.
And here's a shot of the bed on the left.
I'm sure there will be another installment of the "Amateur Gardener" series. I have a feeling I will be building two raised garden beds in the back. Stay tuned.
Location:
Lutz, FL, USA
Tuesday, April 16, 2013
Adrian: Amateur Handyman
To understand this post you might want to read these blogs first.
Adrian: Amateur Gardener
http://angjellockheart.blogspot.com/2013/03/adrian-amateur-gardener.html
Adrian: Amateur Gardener, Part 2
http://angjellockheart.blogspot.com/2013/03/adrian-amateur-gardener-part-2.html
It all started with a Girlfriend, Lyli (not her real name.) And then it continued when she made a much needed move into a new place. It seems the previous tenants did their best to destroy the place she moved into. So the landlords (an old man and his sons) have been doing their best to repair and restore the house as quickly as they can. But Lyli wants to put a few add-ons to the house.
That's where I come in. I can repair a guitar, and do fine work, but can I do house repairs? Well, it's either put up or shut up, and I'm gonna put up. It's time for me to become Mr. Do it all handyman. It's kind of like being a husband with a honey-do list, except for the marriage part. Luckily I have taken pictures of everything. And what's a blog without big ole pictures?
First up was building the plant beds. The pictures from that can be seen in the two blogs I posted at the top of the page.
Next up was laying patio bricks. Lyli wanted them in a checkerboard (red and white) pattern. So first we had to clean out the back of her Ford Explorer, and then make the trip to Home Depot. However, we couldn't fit 136 bricks in the back of her truck. We could only get 80. Which lead to the interesting thought about moving really heavy patio bricks.
1. You move them from the shelf to the cart. 2. You move them again from the cart to the truck. 3. Then you move them yet again from the truck to the ground. Now these things weigh a ton. Or at least 800 pounds, from the best I can figure. Seriously, 80 bricks time 10 pound a piece? That's 800 pounds. You should have seen how the Explorer was sitting low.
But after all my moving the front looked like this:
And even the dog enjoys it.
Now obviously, you can see where some tiles still need to go. But I definitely know that the other 56 needed tiles would not fit in the truck. With that much weight in it, it might have been scraping the ground. But I'm happy with it so far. I get the rest finished up on the next trip to Home Depot. And hey! I'll get another blog out of it.
Next up was the missing railing. I think the house had it before, but it might have rotted or been trashed by the previous tenants. So here's the before pic.
As you can see, no rails. But I did something about it. Here's the after picture.
As you can see, I added the wood (the wood without paint on it) support and rails. I added the top beam so that Lyli can hang wind chimes from it. Here's a better view of it.
As you can see, I already added the nails into the wood to hang stuff. That way I don't have to do it later. I like thinking ahead like that.
So next up is the planting. Now that I have the garden beds built it was time to add some plants next to the bromeliads. Here's the before picture.
And here's the plants we bought. Note: We were able to buy these from a number of vendors at the flea market as well as Home Depot.
So I was working with very little daylight when I started planting them. I wanted to finish before it was dark so I could take pictures. Luckily, the camera I was using has a really strong flash. So if these pictures look a little odd, it's because it was almost dark when I took them.
So that's where I am so far. Here's the future projects I will be attempting over the next few weeks. 1. I will complete the brick patio. 2. Primer and paint will be added to the front door, steps, and ramp. (It will be an awesome shade of red.) 3. Rails will be added to the back steps. 4. Then the back porch will be primed and painted. 5. Then the painting will be moved inside. The kitchen needs painted. And yes, it will be red. 6. Then the trellises need to be replaced, and Lyli wants them painted as well. 7. Once summer comes around I may start to plant more plant beds.
The good news is that this will give me plenty of blogs to write about. I feel that I have been slacking lately on writing my blogs. But more importantly, Lyli is really appreciative of the repairs I have been making.
On a funny note, I told her that she should ask for a discount on her rent for all the repairs she's having done. It couldn't hurt to ask could it?
Adrian: Amateur Gardener
http://angjellockheart.blogspot.com/2013/03/adrian-amateur-gardener.html
Adrian: Amateur Gardener, Part 2
http://angjellockheart.blogspot.com/2013/03/adrian-amateur-gardener-part-2.html
It all started with a Girlfriend, Lyli (not her real name.) And then it continued when she made a much needed move into a new place. It seems the previous tenants did their best to destroy the place she moved into. So the landlords (an old man and his sons) have been doing their best to repair and restore the house as quickly as they can. But Lyli wants to put a few add-ons to the house.
That's where I come in. I can repair a guitar, and do fine work, but can I do house repairs? Well, it's either put up or shut up, and I'm gonna put up. It's time for me to become Mr. Do it all handyman. It's kind of like being a husband with a honey-do list, except for the marriage part. Luckily I have taken pictures of everything. And what's a blog without big ole pictures?
First up was building the plant beds. The pictures from that can be seen in the two blogs I posted at the top of the page.
Next up was laying patio bricks. Lyli wanted them in a checkerboard (red and white) pattern. So first we had to clean out the back of her Ford Explorer, and then make the trip to Home Depot. However, we couldn't fit 136 bricks in the back of her truck. We could only get 80. Which lead to the interesting thought about moving really heavy patio bricks.
1. You move them from the shelf to the cart. 2. You move them again from the cart to the truck. 3. Then you move them yet again from the truck to the ground. Now these things weigh a ton. Or at least 800 pounds, from the best I can figure. Seriously, 80 bricks time 10 pound a piece? That's 800 pounds. You should have seen how the Explorer was sitting low.
But after all my moving the front looked like this:
And even the dog enjoys it.
Now obviously, you can see where some tiles still need to go. But I definitely know that the other 56 needed tiles would not fit in the truck. With that much weight in it, it might have been scraping the ground. But I'm happy with it so far. I get the rest finished up on the next trip to Home Depot. And hey! I'll get another blog out of it.
Next up was the missing railing. I think the house had it before, but it might have rotted or been trashed by the previous tenants. So here's the before pic.
As you can see, no rails. But I did something about it. Here's the after picture.
As you can see, I added the wood (the wood without paint on it) support and rails. I added the top beam so that Lyli can hang wind chimes from it. Here's a better view of it.
As you can see, I already added the nails into the wood to hang stuff. That way I don't have to do it later. I like thinking ahead like that.
So next up is the planting. Now that I have the garden beds built it was time to add some plants next to the bromeliads. Here's the before picture.
And here's the plants we bought. Note: We were able to buy these from a number of vendors at the flea market as well as Home Depot.
So I was working with very little daylight when I started planting them. I wanted to finish before it was dark so I could take pictures. Luckily, the camera I was using has a really strong flash. So if these pictures look a little odd, it's because it was almost dark when I took them.
So that's where I am so far. Here's the future projects I will be attempting over the next few weeks. 1. I will complete the brick patio. 2. Primer and paint will be added to the front door, steps, and ramp. (It will be an awesome shade of red.) 3. Rails will be added to the back steps. 4. Then the back porch will be primed and painted. 5. Then the painting will be moved inside. The kitchen needs painted. And yes, it will be red. 6. Then the trellises need to be replaced, and Lyli wants them painted as well. 7. Once summer comes around I may start to plant more plant beds.
The good news is that this will give me plenty of blogs to write about. I feel that I have been slacking lately on writing my blogs. But more importantly, Lyli is really appreciative of the repairs I have been making.
On a funny note, I told her that she should ask for a discount on her rent for all the repairs she's having done. It couldn't hurt to ask could it?
Labels:
amateur,
books flea market,
brick,
bromeliads,
building,
crafts,
dog,
handyman,
House,
music woodworking,
paint,
Pets,
plants,
repair,
wood
Location:
Lutz, FL, USA
Saturday, March 30, 2013
Adrian: Amateur Gardener, Part 2
Part 1. http://angjellockheart.blogspot.com/2013/03/adrian-amateur-gardener.html
Well, in part 1 of this blog I laid down what I wanted to do. I also posted some pretty impressive photos of other people's gardens. I will say, that is what I would like the garden to be, but if it's anywhere close to that I'll take it as a victory.
So now, let's talk about what we had to work with. The answer? Not much. The house wasn't exactly taken care of by the previous tenants, and they weren't exactly interested in gardening or keeping the house looking nice. So all I had to start with was barren ground. And in Florida that means lots of sand. The whole property is shaded so that means I have to plant garden plants that don't like direct sunlight. That means one thing. Bromeliads.
The first thing I did was what my Grandfather taught me about planting. He said to take your shovel, draw lines in the sand, and plan out where you want to put things. I did that, making sure to leave room to access a control panel on the side of the house.
Once I had it drawn out, I planted some bromeliads. They breed like crazy so my sister had plenty to donate to the garden. I spaced them out, and had a perfect garden started.
The next step was to lay out the boundaries. I used landscape timbers for the border. I cut them to where I wanted them, drilled holes out, and used 12 inch nails to hold them in place. Here's the photos of my work up to that point.
It's small, but it's a good start. It doesn't look that impressive without mulch. Luckily, I have a friend of my Dad's who runs a wood workshop. He was building a project with maple wood, and had a ton of shavings from it. So he donated them to the garden. Here's what it looked like after I had spread the maple mulch.
Once it rains the mulch will be a lot more packed down. I know it's not much, but it's a start. The big thing was getting borders and mulch in. And the bromeliads won't take long to get a hold in the ground. There will be more bromeliads before you know it. I'll see about adding some more flowering plants in there later on. I'm looking forward to writing part 3. Who knows what might show up in the flower beds next?
Well, in part 1 of this blog I laid down what I wanted to do. I also posted some pretty impressive photos of other people's gardens. I will say, that is what I would like the garden to be, but if it's anywhere close to that I'll take it as a victory.
So now, let's talk about what we had to work with. The answer? Not much. The house wasn't exactly taken care of by the previous tenants, and they weren't exactly interested in gardening or keeping the house looking nice. So all I had to start with was barren ground. And in Florida that means lots of sand. The whole property is shaded so that means I have to plant garden plants that don't like direct sunlight. That means one thing. Bromeliads.
The first thing I did was what my Grandfather taught me about planting. He said to take your shovel, draw lines in the sand, and plan out where you want to put things. I did that, making sure to leave room to access a control panel on the side of the house.
Once I had it drawn out, I planted some bromeliads. They breed like crazy so my sister had plenty to donate to the garden. I spaced them out, and had a perfect garden started.
The next step was to lay out the boundaries. I used landscape timbers for the border. I cut them to where I wanted them, drilled holes out, and used 12 inch nails to hold them in place. Here's the photos of my work up to that point.
It's small, but it's a good start. It doesn't look that impressive without mulch. Luckily, I have a friend of my Dad's who runs a wood workshop. He was building a project with maple wood, and had a ton of shavings from it. So he donated them to the garden. Here's what it looked like after I had spread the maple mulch.
Once it rains the mulch will be a lot more packed down. I know it's not much, but it's a start. The big thing was getting borders and mulch in. And the bromeliads won't take long to get a hold in the ground. There will be more bromeliads before you know it. I'll see about adding some more flowering plants in there later on. I'm looking forward to writing part 3. Who knows what might show up in the flower beds next?
Location:
Lutz, FL, USA
Friday, March 22, 2013
Adrian: Amateur Gardener
So I have something new in my life. That would be a girlfriend. I think it's as big of a surprise to me as it is to everyone else. And then to add to the surprises she moved only three miles from me. I couldn't really blame her as her old place was not very nice. It was also in a not so nice section of a town that was far away from both her work and favorite hangout.
She is renting a mobile home that sits on a 1/3 of an acre of property. She really wanted it for her dog who needs some space to run around. He's a little over two years old, but he still acts like a puppy. So this place works out really good for both of them, as she doesn't have to put up with apartment type neighbors and he gets to run around and exercise.
The people who rented before her did their best to destroy the place. That's what the landlord flat out told us. He was more than happy to rent to my girlfriend in that, she expressed an interest in rebuilding the place inside and out. She talked to him about adding plants to the place, as it is kind of sparse. He was all in favor of that, and told her she could do whatever she wanted as far as plants were concerned.
And this is where I come in. I am good at manual labor, but I have to admit that I am an amateur gardener. The only gardening that I have been successful at it online playing Wizard 101.
So I was told to come up with a plan. I have given it a lot of thought, and have come up with four spots to start off with.
First I have to contend with what is available. There is a lot of land, but due to the heavy cover of oak trees it is mostly a barren sandlot.
That's okay. I will just have to get creative. I was thinking of running/building a wooden fence along the front of the house.
My girlfriend knows someone who knows someone, and can get me some leftover two by fours. It may look a little odd until I slap some paint on it. Then it will start to look spiffy.
I was thinking about planting some giant bromeliads behind the fence/ in front of the house. Those things will grow in anything down here in Florida.
Next to them/ around them would be a good place to start growing some Aloe Vera plants. My girlfriend has always had them, and they are really useful to have around.
So that's what I am thinking for the front. When I say from the front, I mean from the house door and going left. That's the longest part of the house. From the door going right is a nice small spot. However I think I have an idea. I am thinking of doing a raised bed. There are a couple ways to do this. The first is kind of simple and involves using concrete blocks. It looks like this.
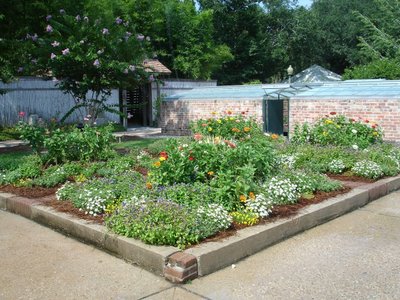
That's simple enough, and won't take much time to put together. Then there's the other way. It involves using red bricks. It would be a bit more expensive, and take more time to put together, but it would look sweet.
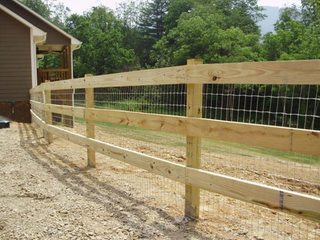
However due to having a dog it would need to be fenced in. I do like this type of fencing.
But I have to be honest, the dog is really, really good at jumping. He's also really good at building up speed and jumping. So that kind of fence isn't going to stop him. I was thinking of putting up the wooden type fence that would match the front fence, and then stapling chicken wire to it.
The next step involves planting tomatoes. As you look at the property, the very front right corner has a lot of sunlight hitting it. It's the only place where grass grows on the property. I thinking about setting up a raised bed strictly for tomato plants.
The plant would be able to get a fair amount of sunlight there. Not too much, not too little. And the good news about Florida is that, we get crazy amounts of rain all year long. And anytime tomatoes get rain, they grow till they want to explode.
So that's the four main ideas I have for garden beds. I don't think I would be overdoing it. I am trying to stick with plants that are native and not hard to raise. I am lucky in that, I have a lot of people around me who know the ins and outs of plants. I may not know much about plants, but I am good for the manual labor. With those things combined, I feel that this garden will be a success.
She is renting a mobile home that sits on a 1/3 of an acre of property. She really wanted it for her dog who needs some space to run around. He's a little over two years old, but he still acts like a puppy. So this place works out really good for both of them, as she doesn't have to put up with apartment type neighbors and he gets to run around and exercise.
The people who rented before her did their best to destroy the place. That's what the landlord flat out told us. He was more than happy to rent to my girlfriend in that, she expressed an interest in rebuilding the place inside and out. She talked to him about adding plants to the place, as it is kind of sparse. He was all in favor of that, and told her she could do whatever she wanted as far as plants were concerned.
And this is where I come in. I am good at manual labor, but I have to admit that I am an amateur gardener. The only gardening that I have been successful at it online playing Wizard 101.
So I was told to come up with a plan. I have given it a lot of thought, and have come up with four spots to start off with.
First I have to contend with what is available. There is a lot of land, but due to the heavy cover of oak trees it is mostly a barren sandlot.
That's okay. I will just have to get creative. I was thinking of running/building a wooden fence along the front of the house.
My girlfriend knows someone who knows someone, and can get me some leftover two by fours. It may look a little odd until I slap some paint on it. Then it will start to look spiffy.
I was thinking about planting some giant bromeliads behind the fence/ in front of the house. Those things will grow in anything down here in Florida.
Next to them/ around them would be a good place to start growing some Aloe Vera plants. My girlfriend has always had them, and they are really useful to have around.
Then to spice up the color a little I would add some of those small floppy ear type plants. I'll admit, I have no idea what the different ones of them are called. But I do have a bunch of plant people I know who can tell me what they are. All I have to do is show them this picture.
So that's what I am thinking for the front. When I say from the front, I mean from the house door and going left. That's the longest part of the house. From the door going right is a nice small spot. However I think I have an idea. I am thinking of doing a raised bed. There are a couple ways to do this. The first is kind of simple and involves using concrete blocks. It looks like this.
That's simple enough, and won't take much time to put together. Then there's the other way. It involves using red bricks. It would be a bit more expensive, and take more time to put together, but it would look sweet.
Okay, that takes care of the front. I was thinking of using the front for the decorative plants. However, the one thing my girlfriend really wants is a herb garden. There could be a few vegetables thrown in there, but mainly for herbs.
However due to having a dog it would need to be fenced in. I do like this type of fencing.
But I have to be honest, the dog is really, really good at jumping. He's also really good at building up speed and jumping. So that kind of fence isn't going to stop him. I was thinking of putting up the wooden type fence that would match the front fence, and then stapling chicken wire to it.
The next step involves planting tomatoes. As you look at the property, the very front right corner has a lot of sunlight hitting it. It's the only place where grass grows on the property. I thinking about setting up a raised bed strictly for tomato plants.
The plant would be able to get a fair amount of sunlight there. Not too much, not too little. And the good news about Florida is that, we get crazy amounts of rain all year long. And anytime tomatoes get rain, they grow till they want to explode.
So that's the four main ideas I have for garden beds. I don't think I would be overdoing it. I am trying to stick with plants that are native and not hard to raise. I am lucky in that, I have a lot of people around me who know the ins and outs of plants. I may not know much about plants, but I am good for the manual labor. With those things combined, I feel that this garden will be a success.
Labels:
aloe vera,
bromeliads,
dog,
Florida,
garden,
gardens,
House,
plants,
raised beds,
tomatoes,
Wizard101
Location:
Lutz, FL, USA
Subscribe to:
Posts (Atom)