I look at life a bit differently, and like to post my weird thoughts. I like musicial instrument repair and woodworking. For trying to live a somewhat normal life, a lot of weird things happen to me. Instead of putting up with it, I post about it in this blog.
For a while now I've been thinking about upgrading and overhauling my cello. My cello is a 1987, Model 360 Erich Pfretzschner. It was made in Romania when Romania was the China of Europe. So yeah, it's not the $5000 cello that they "recommend" for beginners, but most of my orchestral classmates played on what could only be described as "glorified cardboard."
Aside from one other cello, mine was the best of all my classmates for the entirety of my junior high and high school years. So I'd like to thank my parents for indulging a twelve year old's music career. I don't know too many other parents that would have done that.
In fact, over the years I've kept up with what they are selling for on the used market. It turns out that they have been losing value as time has gone on. I'm guessing fewer orchestra players and the flooding of Chinese instruments has lowered the value on all the violin family of instruments.
Still, it's been the only cello I've ever known. It was set up by a great luthier, William Walls of Tampa, Fl. My cello is still equipped with the bridge he made for me, as well as the endpin. So I really haven't planned on buying another cello. I just want to make sure this one is set up and upgraded.
Here's a photo of me playing it back in 1988.
So I have a three part plan on upgrading my cello. Or maybe it's a three stage plan? I used the word "stage" in my title.
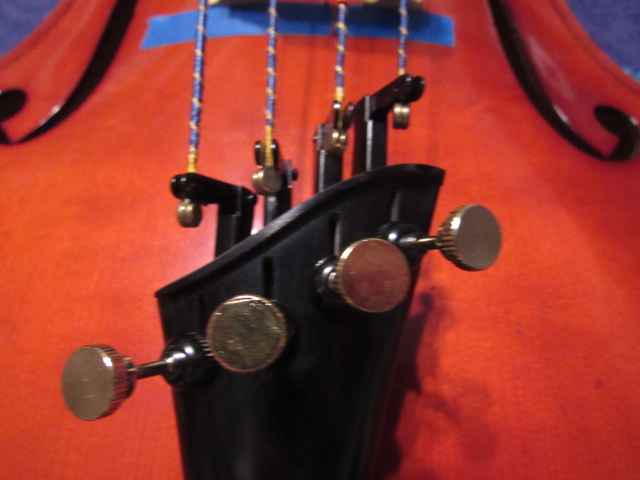
Step/Stage/Part One: I have replaced my tailpiece with a harp style Tailpiece. If you look at the photo from 1988, you'll see the original tailpiece. In all honesty, it was garbage. The second tailpiece, as you can see in the top photo, was gifted to me by my private cello tutor Laura Smith of the Florida Orchestra.
This one has served me well for over 30 years. However I thought it was time to upgrade to an ebony harp style tailpiece. Harp tailpieces are supposed to help cancel out wolf whistles. If you've ever heard a squeaky violin you know what I'm talking about. So I bought an ebony tailpiece from where ebony is grown, India. Thank you E-Bay. It cost me all of $12.
I bought gold fine tuners for it off E-bay as well. So I put it all together, and put it on my cello and noticed a problem. The tailpiece's edge came out too far. It wouldn't let the fine tuners adjust. So I thought about it for a while.
Finally I said to myself, "Hey, I'm a luthier. What if I just take it to my belt sander and sand the edge back? Then it would let my fine tuners move freely. I didn't immediately take photos. It wasn't until I had started sanding that I thought about grabbing my camera. Here's a photo after I had sanded a bit of the edge off.
Then I got to thinking again. I know, I talk to myself all the time. I just don't shut up. But I said, "Why take off just enough? If I take off more the fine tuners will have even more room to move." So I took off some more.
Now this works. I have to say, I'm glad I took more off. The tuners have a lot of room to move now.
So now it was time to string it up.
Now this is progress. I had to remind myself that not all universal parts are universal. But when you learn to work with what you have that's when you start to become great at what you do. It forces you to think outside the box.
So stay tuned for Stages two and three. Stage two should be soon. The part I have ordered for it is located here in Florida. So it shouldn't be too long before it gets underway. Stage three may be a month off. I had to order parts from China, and they can take a while to get here. Sometimes it can be as soon as ten days. Other times it can take six weeks. So stay tuned. More to come.
"If it's not Baroque, don't fix it!" Those words were said by one of my high school orchestra teachers, Mrs. Huthmaker. It was one of the few things she actually managed to teach me. That thought came to my mind many years after it was first said to me.
For fun I was looking through the cello section on E-bay when I saw something that I didn't recognize. That was good since I was searching for cellos that were not a typical Stradivarius or Guarneri. However, what I was looking at was in the cello section, but it was not called a cello. It was a Viola Da Gamba, a member of the Viol family.
I honestly had no clue what that was. I started playing cello when I was 12, and no one ever said anything about it. Wikipedia here I come.
Just to put this in perspective, the years from 1600 A.D. to 1750 A.D. are known as the Baroque period. One of Stradivarius' earliest known violins is from 1666. Some of his most "valued/sought after" violins are from 1680-1690.
What I am trying to say, Baroque music had been in full swing for almost a century before Stradivarius became known for producing his violins. So this leads to the question, what "violins" came before them? It turns out this:
So all those pictures I saw where the cello looked like it was melting and didn't have an endpin, well that was not so much "artistic license" was it was what a real viola da gamba looked like. Here's some vintage paintings and sketches.
It actually makes a bit of sense now doesn't it? The funny thing is that, I can't believe that I had to learn about this from E-bay off all places. Of course now I want to buy one, but ... what does it sound like. Let's pull up YouTube!
Okay, that's talent. I mean. That is talent. I don't even play seven stringed guitars, I wonder what I would do with a seven string bowed instrument?
Of course, the nice thing about the two Chinese instrument shops on E-bay is that they have what I would call a hybrid of a Strad style cello and a Viola Da Gamba. Here's a picture of the Viola Da Gamba on the left and a Strad style cello on the right.
Now here's what they were selling.
The shape is more consistent with the Viola Da Gamba, but it has a modern tailpiece, fine tuners, and very noticeably an end pin. Also, the angle of the fingerboard is a more modern shape.
One thing that can be changed for a truer, vintage sound is the strings. They still make gut strings as well as synthetic strings that sound like gut strings. Stringing those on this instrument would help towards a more Baroque sound.
So now, I have a few options. The two Chinese E-bay stores sell a variety of these Baroque era recreations. Some are very close to the original makes, others like the one above are hybrids. They also sell, "violins in the white," which means they are assembled but unfinished.
I would like to buy an unfinished hybrid. That way I could add the things I wanted. I could also stain it, and French polish (shellac) it instead of it coming with a heavy varnish. That's the one drawback to a lot of new instruments. They put on a heavier coat of finish than necessary. It ends up stifling the sound.
Since I would most likely want a four string hybrid, in the white Viol Da Gamba/Cello, I would consider almost making it a steampunk type instrument. It would have vintage stylings with modern attachments.
Let's start with the color. I could stain it wine red like all those Gibson Les Paul Customs. I would then finish it with shellac. Okay, I would be a little more artsy than that and French polish it, but either way, it's still putting shellac on a wooden instrument.
Next up, metal gears. That's right. They've had them for cellos for about a hundred years. Why not make use of them?
When it comes to tailpieces there are so many options. They make them in many types of wood, as well as a variety of styles. I even considered a brass tailpiece, but that would affect the tone. It might add a touch of brightness that I wouldn't want. Maybe not so much brightness, as a tinny sound. What I would really consider is a harp style tailpiece.
Another fun thing is that there are so many different pickup systems out there. I'm not sure where I would start. The costs are variable, but some of the nicer ones can get really pricey. I still have a lot of research to do on this.
Something else that would be quite modern is the use of a bone nut instead of an ebony one. Bone nuts have been used on guitars for a while, but not usually on orchestra instruments. I built one for my electric cello, and I am completely happy with it.
One thing they have now that they never had when I was a kid is a wolf whistle eliminator. Basically, a orchestra instrument will have overtones which are just awful. I mean the screechy howling sound that people hate when a kid first picks up the violin? Yeah, that's a wolf whistle. They now make a device to eliminate that sound. Where was this when I started out. It would have saved my parent's ears.
The one way to truly influence sound is find a good set of strings. For the longest time I didn't have a clue that good strings could change not only my tone, but my volume. Back when Mars Music was closing down I snagged a good deal on some D'Addario Helicores. They blew my mind. Before, all I knew was Red Label. I didn't know what some decent strings could do. The Helicores turned my tone up to 11, dang near doubled my volume, and bought out my bass notes.
I found out for electric orchestra instruments the Helicores tend to work the best for pickups and pickup systems. That's one reason I also put them on my electric cello. If I get a good deal on something else I may try them out. Especially if they are darker and/or warmer. But after having such good luck with the Helicores I will probably stick with them.
So I have a lot to think about. First up, finding a way to pay for it all. Right now it's just a pipe dream. But that's okay. I'm a bit of a daydreamer, and this is a good thing to daydream about. Let me think of what I would like to do, and keep a look out for new items being put up on E-bay. You never know what might come up.
And of course, the mandatory picture of me when I just received my cello. I was 12 in this photo.
I have been working on the violin top, and have run into a question that perplexes most luthiers. When is the top thin enough? Think about this, I am supposed to get the top down to 3mm. That's right, that thin. In fact, right down the middle of the top I am supposed to get it down to 2.6mm (if possible.)
This leads me to wondering how I will get an even thickness all the way across the top? I may shave some parts too thin, while leaving others too thick. I have already used my drill press to make marking points all over the violin. However, I can only get so close, and I still need to check the overall depth. I also need to check to make sure there are no high spots.
Luckily I stubbled onto a great idea. The spruce is a very uniform white color, and when thin enough, the light will shine through it. I found by holding the top up to my work light, I can see high and low spots. It may be easier to show the pictures, and then explain.
I know it can be tough to see what I am posting. I had to take pictures in the dark with the work light from behind the violin top. Also, I couldn't use the flash. What you are seeing are the different colors shining through. The white is where it is the thinnest. The red is a little thicker. Where no color is showing is where it is too thick, and needs to be shaved down.
Now I do want to say that it is so nice and uniform because these pictures were taken after I did all the work. If I had taken some "before" pictures it would have looked a lot different. It would have had a lot of high spots.
I am really proud of myself. To get a piece of wood this consistently thin is quite an undertaking. I have to say that working slowly and steadily is the only way to do this.
I suspect in my next post I will be working on the top design, the F-holes, and the bracing. At least, I hope I will.
Little by little I have been working on my strange violin. In my last violin post, I was working on carving out the inside of the backplate. I have it just about where I want it.
I have smoothed it out a little more since this picture was taken. But you get the idea, the shape is really coming along.
Here is the rough shape of the Adirondack Red Spruce top after it was cut out on the bandsaw.
After a lot of work, we will fast-forward to what the top plate looks like in the hands of me!
That's a lot of work. Luckily, the spruce cuts a lot easier than the black walnut did. So now it's time to cut out the underside.
I used my dremel tool to cut out the inside to save time. I then use my hand planes to smooth it down to the required thickness.
Here's a closer look at the inside. You can see the depth marks (they are the small holes.)
Finally, I will show the top and back plates side by side.
There's still a lot of work to do on the top plate, but it is coming along nicely. I just hope it sounds good after I put in all this hard work.
When I left off from Part 1, I mentioned that I would be ordering an Adirondack Spruce top soon. Well I did, and here's the pictures of it.
Here's a picture of it being glued together.
I know it looks like I over did it with the clamps, but I only have one chance to get it right.
Next I started working on the back of the violin. In case you missed the part 1 of this blog, the back is made of black walnut. I have already carved the top part, but I needed to carve the inside of the back. To save me hours and hours of hand carving, I decided to use my dremel.
After using the dremel, I started to use my convex hand planer. I used it to smooth out the inside. I also used a variety of hand sanders. You can see in the next picture how much smoother the inside is starting to look.
After a few hours work, I decided I had done enough work for the day, and would continue my violin building tomorrow. Here's where I left it.
Next up, I will be completing the inside curve of the back. I will also start work on the spruce top. I will also start searching for the perfect pieces of rosewood to make the sides out of.
I am getting serious about building a violin from scratch. I am also serious about doing it my way. Since I am making this one for me, I figure, "What the hay" if I piss off the purist violin builders. I think the violin could use a bit of updating, and I'm going to be the one to do it.
So here is the back of the violin. It is made of black walnut instead of the standard maple.
Here is a picture of the back after I shaped the outside. I still need to shape the inside of the back. However, I need a very specialized plainer to do so. So it's onto other parts.
I will skip writing down all the hard work I did to get the neck like this. Basically, it was taken from a hunk of Rosewood, and then I worked my magic on it. Again, it's not a typical violin form, but I think it looks really beautiful and modern.
I have also decided to make the fingerboard out of Rosewood. Again, I will skip all the hard work I put into it, and simply say that I got it from a chunk of Rosewood, and shaped it down. The tough part was to get the curve on the fingerboard just right. It has to have a uniform curve with no dead spots in it. Note: A dead spot is where a spot in the wood is so low that the string can't vibrate properly.
Next up will be making the sides. I already have made the form for them to fit into after bending. I will also be ordering a spruce top soon. More pictures will follow.
I feel pretty lucky to live in Florida. There are nice selections of native, and no so native trees that grow here. About fifty years ago there were a lot of East Indian Rosewood planted around the Tampa Bay area. It has been my luck to run into some of this Rosewood, and I am more than happy about that.
I have been working on building a violin for a while. But I didn't want this to be a copy of a Stradivarius violin. In fact, I wanted it to be quite different. 99% of violins are copies of Stradivarius guitars for a reason. They can't sell them otherwise. However, since this violin is for me or my friends, I am happy to build it very differently.
And that brings me to another point. I am first and foremost a guitar builder. Guitar builders are never satisfied with one design. Leo Fender didn't stop designing when he created the Fender Broadcaster (later named the Telecaster.) He went on to design the Stratocaster (guess who that's named after), and then quite a few models with G&L guitars. So why did violin designs stop with Stradivarius's design?
Stradivarius didn't have access to the North American hard and softwoods that luthiers have access to now. He didn't have Rosewood. To be honest, I think he would have liked Rosewood, Black Walnut, and Sitka Spruce. He had to use what he had, and I think a lot of people don't realize that.
The violin that I am designing takes quite a few ideas from different builders. First and foremost would be Robert Bennedetto, the Godfather of the modern archtop guitar. I learned more about guitar design from him than I ever thought possible. The bracing system I will use is based on his style of X bracing. I also took the body design from the pre-Stradivarius Russian violins. The headstock/ scroll design I updated what I thought would be a more modernized styling. And the woods I am using are woods that will give a more balanced voice to the violin.
And speaking of woods, here are some pictures of the wood that is rough cut.
You can see the neck and two fingerboards rough cut out of Rosewood. Oh, and this Rosewood is quartersawn for strength. It's pretty uniform in it's grain pattern and color.
This piece of wood is for a project way in the future. This Rosewood plank will be used for a cello fingerboard.
As more Rosewood gets cut I am going to have more pieces of wood for my various projects. I will hopefully be able to post a blog in the future showing them. But for now, I have plenty of wood to play with.