Showing posts with label electronics. Show all posts

Tuesday, May 29, 2018

A Big Muff Slice Of Pi (A Guitar Pedal Story)

One of the most well known guitar pedals of all time is the Electro Harmonix Big Muff Pi.  Yes, it's really called that.  There are countless versions, clones, and kits for every type of Big Muff you can think of, and a few you didn't.

Back when I was working at an independent guitar shop, the shop carried Electro Harmonix (EHX) pedals and tubes.  It was then that I bought my first Big Muff Pi guitar pedal.  Recently, I found out the version I have is version 8.  Also known as the Black Russian version.  Namely, because the outside housing is black and it was made in Russia.

I also happened to find out that it was extremely valuable on the used instrument market.  It seems bass players liked that version since the pedal didn't go into full blown distortion when the gain was set at 1 or 2.  Basically version 8 had the most usable, as well as widest amount of distortion of all the models.

Bass players could set the gain between 1 and 3 and it would be the perfect amount of gain for them.  Guitar players who would need more could turn the gain up, and it would be perfect for them.  For my tastes I liked the gain set between 3 and 5.  It made a nice breakup at that setting, and not go into full blown Smashing Pumpkins at that level.

So I faced a dilemma.  Do I put this valuable pedal on my pedalboard?  Also, one problem with this model, is that, it only took a 9 volt battery.  It couldn't be powered by a 9 volt power adaptor or modern day power brick.  However I found solution.  I would buy a DIY pedal kit.

EHX Big Muff Pi Replica Complete Kit

A company called General Guitar Gadgets (GGG) sold DIY pedal kits for all the different versions of the Big Muff Pi.  I thought, "Hell yeah!  This will be great!  I'll build my first kit, and learn a few things in the process!"

(Note:  While I did learn a few things in the process, many life lessons are learned the hard way.  Keep reading.)

So I ordered the kit.  Here's what it looked like when it arrived.


I did upgrade to the larger pedal housing (1590BB.)  So far my cost was just under $70 including shipping.  That's what I figured it would be, so I was alright with that.

Next, I dropped the housing off to be powder coated.  I had American Powder Coating in Tampa do the work.


I have to say they did an outstanding job.  It was better than I expected.  What I didn't know, is that, most of the cost is for sandblasting, handling, and baking the housing.  Even though they didn't use much paint, there as much labor as there would be for a larger part.  So the cost of the powder coating was $40.  However, I do want to be clear that they did an outstanding and amazing job.

I also ordered a few parts from Small Bear Electronics.  I wanted to put some green chicken head knobs on the pedal, as well as, use a different LED light.  So I bought a few lights in case I blew one up.  I also bought some capacitors for future guitar projects.  With shipping it came to $12.


Next, I had to organize everything.  To make things simple I taped everything to a piece of cardboard and labeled it.


That took a while.  But I was quite happy with myself.  Next, it was time to solder everything in.


We'll fast-forward here.  Let's just say I put a couple of hours work into this.  Next up was running the wires to the pots and jacks.


Next up, it was time to see if it worked.


It lights up so it must be working right?  Um, no.  I tested everything I knew how to do, and then thought it over.  To make a long story short I called Mike Jay at Pro Audio Electronics in Tampa.  Mike is a great guy, and said to come on over.

He had an apprentice at the shop and this was the perfect project for him to learn on.  Something I learned right there was that Mike and his technicians had a lot of specialized tools that I didn't.  It took a while to get the pedal working but Mike told me, "Other than reversing the NPN bipolar junction transistors (4 of them), a few cold solder joints, and using two wrong resistors you did it perfectly!"  At least he said it in a way that we all could laugh at.  Yeah, I had to laugh at that.

He told me not to worry about paying him for the pedal work.  I had done all the hard work, and it was a learning experience for his apprentice.  I also figured it was also because I just had $400 worth of work performed on an amp not too many months ago.  I did tell him that since he had used seven small pieces worth of parts (the transistors and the resistors) I should at least give him seven dollars for the parts.  He said he would put it towards pizza money.

Once his team got the pedal working it was like an anvil had been lifted off my back.  I was so thankful.  I also swore this was the last pedal kit I was ever going to try.  I really don't have the specialized equipment that his shop had.

So I brought the pedal home, and started to label it.  I had bought some stickers from Michaels for $3.00 just for labeling this pedal.


Okay yes, it's very sparkly.  I didn't think it would be this sparkly.  When I picked the pedal color out at American Powder Coating I knew it would sparkle like on a motorcycle tank, but I didn't think it would have that much sparkle in it.  I thought it would be darker, that's why I bought the gold sparkle stickers.  However, they ended up being much more sparkly than I thought.  So my pedal looks like it was hit by Kerry the Sparkle Fairy.


So the big question, how does it sound?  Honestly, I don't think it sounds as good as my original Big Muff Pi.  Although, the one amp I ran it through isn't that great, and the other was being contrary.  It looks like I might end up taking that one to Mike Jay, huh?

Honestly, I think I need more time with it.  The one thing I really like, is that, like my Big Muff Pi, it has a wide range of tones.  I think I just need to find the right one for me.

So what's the total cost of this adventure?  Let's see...

$70 for the kit.
$40 for the powder coating.
$12 for the small parts.
$ 7 for the pizza fund.
$ 3 for the stickers.
________________________

$132. total.

Of course, I had to buy a new soldering iron for this project.  My old one didn't have a super fine tip.  I can't really add $22 for a new iron to this project since I'll use it for years to come.  However, it was an investment I had to make for this project.

After I had completed this pedal project I found out some new information.  EHX likes making re-issues of different models of the Big Muff Pi.  It turns out version 8, the Black Russian version, is now called the Bass Big Muff Pi.


Remember how I said that bass players liked that version?  Well, they came out with this this reissue to make them happy.  It only costs... $81.40?  Wait!  So it was just cheaper to buy this, and not do all that work?  I could have just ordered it from Musician's Friend with free shipping?


Remember what I said earlier about life handing out hard learned lessons?  Well, this is it.  At least I have a niffy guitar pedal to remember this lesson by.  

Sunday, January 1, 2017

Squeezing The Tone

As you know car guys, motorcycle guys, and guitar guys like myself are always trying to "tweek" a little more power out of their equipment. I decided to try an experiment with one of my guitars.

This is not my personal guitar, but looks exactly like my Epiphone Les Paul Honeyburst Plain Top.


There has been a lot of talk on the internet about the different type of capacitors in guitars. Oil in paper caps were in the earliest Gibson guitars, so that's what the gold standard is.


I have read many articles with differing opinions on the subject. Some say if a cap is 0.022 uf., then why change it out for another cap that is the same value, just because it is supposedly a better capacitor? Another article I read ranked the caps from worst to best. The author had a great write-up on how each cap affected the pickups and electronics.

I also read comments where players said it made a difference, and others who said they couldn't hear one lick of difference. Now, I know that not all ears are created equal. I'm not the best player, but thanks to training from my cello teacher Laura, I pride myself on having great ears. 

I was always good at recommending pickups to players due to being able to hear the differences in the EQ, compression, and the presence. So if I could "tweek" out a little more tone out of a pickup by just changing a $1 part, I'll give it a try.

The author of the ranked caps article said that he considered Mallory caps to be just second to a true oil in paper cap. I still had a Mallory cap from an old project. (It was my very last cap in my parts drawer.)  I decided to use my Epiphone Les Paul plain top as a guinea pig.  Here's the Mallory cap.


I sound checked my guitar before changing the cap, and then played it immediately afterward. I only changed the neck tone cap. That way I could focus on one pickup. I also made sure I was taking out a 0.022 cap, and putting in a 0.022 cap.

The result? I couldn't hear one blasted amount of difference. I tried. I really did. I rolled the tone control back and forth. I played through two different amps. I don't think it changed a dang thing.

One thing I will concede is that better made caps are more true to their value.  For instance, better made caps have tight tolerances.  Meaning if a cap is marked 0.022 uf, then a well made one will be within a 5% or less tolerance.  So while one cap may not be better than another type, it could be out of spec.  And that could make a difference

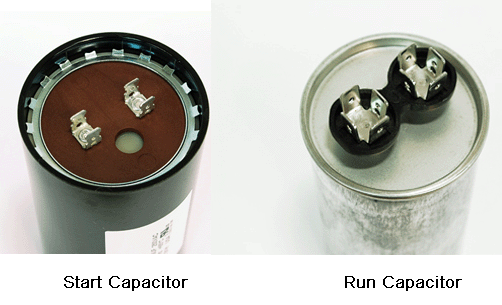
One thing I haven't mentioned is that in electronics there are start caps and run caps.  This is important in high powered machines.  The start cap provides a voltage jump to get the machine started, and the run cap keeps the machine running.  The start cap drops out after a few seconds (45 seconds at the most.)  So there are different types of caps.


So what does this have to do with a guitar cap?  Well, a guitar pickup (for the most part) is passive.  In other words you are not running 220 volts through your pickups, caps and pots.  But here's where it gets interesting.  A run capacitor is usually oil filled, like a oil in paper cap.  In other words those classic caps used in those vintage guitars are run caps.

Even weirder, the poly caps that are used now-a-days are start caps.  So I will say there is a difference in what they were originally created to do.  Here's a great article about run vs. start caps.


Again, I pride myself on having a dang good ear. I also know my equipment. I've had this guitar for 9 years, and the main testing amp for 10 years. I know in my heart and my ears that changing out the original cap to the Mallory cap didn't change the sound at all. 

So, I'm glad I tried. It didn't hurt anything, and I came away with a different point of view.  I admit, I have to rethink what I thought I knew about capacitors.  I am still conflicted on whether I should spend $5 to test out a paper in oil cap.  That's the only thing I can think of that may affect the one that I haven't tried.     

Wednesday, September 14, 2016

HVAC: Home Edition, Part 2

A few weeks ago I cleaned out the squirrel cage blower on one of our A/C systems.  We have two systems to cool down the house.  So I finally got around to cleaning the other blower.  First up, this is what I was looking at.


It's a bit different than the other unit, but then again, that one has been replaced twice.  This unit and system is still running after 22 years.  Of course, I was told that it hadn't been cleaned in 22 years either.  So let's get to working on this.


Luckily, I only had to disconnect a few things, and not cut any wires.  It was a bit dusty on the outside, as well as rusty.  And by rusty, I mean, one of the screws holding the unit was being a pain in the butt as I was trying to get it out.  Take a peek.


But it did manage to come off with some elbow grease.  Then I managed to get the whole thing disassembled.  And it was a bit dusty if I do say so.


Yeah, it's a bit dirty. 


So I got around to cleaning it up a bit.  Between brushes, screwdrivers, and compressed air, I think I got it looking somewhat decent. 


Then came the hard part.  Putting it all back together.  Everything was going fine until I found one plug-in that didn't have anything to plug in to.  So I actually looked at these pictures I took, and found one thing.  Take a peek at the upper left hand corner.


Do you see the plug that doesn't actually plug into anything?  Yeah, that's what I was dealing with.  So once I found that it didn't actually plug into anything I was able to put everything back in place. 

So that's another great HVAC victory in the books.  After putting the cover on, and turning the system back on, I had to put my ear against the blower to make sure it was running.  In other words, it was running so smoothly I could barely ear it.  That's a good thing.  It shows that I got it nice and clean. 

So it's onto the next project sometime or another.  I'm learning a lot in class, and hope I can continue with my string of success.