Showing posts with label acoustic. Show all posts

Sunday, May 5, 2019

Tattooing Josh's Guitar

I have this friend named Josh.  Josh is a great guy, but he's a little rough on his guitars.  In fact, I've written three blog posts previously about how rough he is on his guitars.  Here they are in order.

Repairing Josh's Guitar, Part 1.

Repairing Josh's Guitar, Part 2 

Repairing Josh's Guitar.... Yet Again 

So after roughing up his Dean acoustic Josh decided to buy one of the newer Martin Guitars that are made in Mexico.  The interesting thing about these guitars, is that, they have a thin, almost hand rubbed finish on them.  It helps in projecting sound, but it so makes them vulnerable to be dinged up.

As I was setting up the Martin, Josh told me how he had all his students sign his guitar.  He wanted me to do so as well.  As I looked over the back and sides there must have been fifty signatures all over it.  So I added my signature as well.

I told Josh if he was writing all over his guitar I could do some wood-burning on the top of it.  I showed him the different tips I had for wood-burning, and what designs I could do.  He agreed to it, but only wanted a few designs.  So this is what we came up with.


I kept trying to add more to the designs, but Josh wanted to keep it minimalist.  A few weeks later I sent him a photo.  It's test piece to show Josh what I could wood-burn into his guitar.  This is the photo I sent him.


He then changed his mind, and said I could burn whatever I wanted into the guitar.  So yesterday I came up with this.


And here it is after being strung up.


The writing underneath the fretboard says, "Linda's Voice."  Linda is Josh's Grandmother.  He named this guitar after his Grandmother, so I suggested we wood-burn her name into the guitar.  I also thought that maybe we should add either "Song" or "Voice" after her name.  Josh thought that was a great idea, and chose "Voice."

So there's still room to add more "tattoos" later on.  I was thinking about something like the tree of life designs that some Ibanez Guitars have on their fretboards.  Except I would have it start at the bottom end of the guitar, and come around past the bridge, and underneath the soundhole.  It's something to think about down the road.  But for now I think it's perfect.

Tuesday, March 14, 2017

Intense Guitar Upgrade: The Blueridge

A few months ago I sold off a few guitars that I no longer played.  With 24 hours of selling one I bought another... to sell.  It was a Blueridge acoustic, and the price was right.


The problem is, I liked it too much.  However, I knew it would have to go.  But first, it needed a fret job.  I thought about just fret-dressing it, but the grooves were too deep.  Someone had really played this one.  The good news was that, it didn't really have any marks, cuts, dents on the body.  So while the frets seemed old the rest of the guitar appeared to be in good shape.  I ended up installing some new frets into it.

Here's a few pictures of the work I performed.  I won't show all of them since that would involve an insane amount of pictures. 


And here is it with all new frets.


The client that was going to buy it wanted a pre-amp installed into it.  So I suggested a system, and he ordered it.  Now it was time to install it. 


I was insanely careful on cutting the hole for the pre-amp.  It turned out perfectly.  I couldn't make it any better if I were to do it another 100 times. 

However, I ran into a problem.  The slot for the saddle was not deep enough to add a piezo pickup.  This lead to a bit of a problem.  The only way I knew to make the slot deeper was to use a jig from Stewart MacDonald.  However, that was dang near $200 dollars.  So I looked for other solutions. 

To make a long story short, I bought a router base and a downward spiral cutting bit for my Dremel.  On a side note, I already had a router base, but not like this one.  This one had an attachment so that I could cut in a straight line.  I also had to make a jig that set at the angle of a pickup saddle. 

Making the jig and setting up the router took longer than actually cutting the slot.  Here's some photos.


Believe it or not, that's my jig.  The good news is that, it is exactly, and I mean exactly, the same angle as the saddle. 


Here's my Dremel in the router base. 


Since I am not a CNC machine, I knew I would cut the slot wider than the saddle.  To compensate, I used an oversized piece of bone nut, and cut it down to the correct size for a new saddle.  I followed the angle of the old saddle since it was cut just right.  Here's the finished product.


It came out perfectly.  I'll admit, I did the happy dance when I tuned it up, and took final measurements.  Every little thing came out exactly as I wanted.  It looks like it came from the factory with all the changes I made to it.  My client was exceptionally happy with all the work I performed.

Since I managed to make everything so perfect, I decided to work on my own personal guitar, a Walden D-710.  I bought the guitar as a 2nd.  The neck angle on it was incorrect so that it made the strings too high. 

Years ago, I had attempted to bring the saddle height down with not so great results.  I even had to shave down the bridge with a hand planner since the strings were so high.   

Since I now had a new jig, new router base, and a new carbide downward cutting bit, I thought I should fix it.  I also bought another oversized piece of bone nut to cut down to size.  I'll skip the long story, and just show the pictures on how it turned out. 


It came out exactly as I wanted.  The string height is finally where it should be.  The bone saddle is sitting in the slot correctly.  And I even think the sound is better.  But in all fairness, I did add a new set of strings on the Walden. 

I have to say I felt so good about all the work I performed that I felt great the entire week.  I was happy with both guitars.  My client was happy with his guitar.  And everyone was just plain happy.  It made for a good time.  I'll chalk this one up in the win column. 

Sunday, September 4, 2016

All About That ... Well, You Know

I finally bought a piece of musical equipment that I have never had.  A combo bass amp.  But before I get into that, let me catch you up.  You see, I bought a Dean Razorback for a great price.   Here's a picture of it.


However, I didn't really have a use for such a metal guitar.  I don't really play metal much anymore.  And even if I do, I still have a few other guitars that I would use to play that style of music.

So I decided that I really needed a Fender Blues Jr., Mark 3 combo amp.  It would be perfect for carrying and playing coffee shops.  So I traded the Dean Razorback for the Fender Blues Jr. 

I didn't really care for the sound of the EL-84 tubes, but then I read on the internet about a "mod" kit to make it better.  So I did that.  I also added $80 worth of expensive tubes.  Not only that, but I added a pretty good speaker to it.


Guess what?  I still didn't like the sound.

Here's the link to everything I did with that amp:

http://angjellockheart.blogspot.com/2016/08/fender-blues-jr-new-mod-day.html

So I sold it off.  Now I have money burning in my pocket.  What to do?  Should I hold on for a rainy day?  Should I buy another guitar amp?  Maybe this time a Fender Hot Rod Deluxe with the 6L6 tubes? 

But I thought about it, and realized I already had amps that were better than that.  What I didn't have was a bass amp.  I had two basses, but no bass amp.  I had been using an old SUNN Alpha 212R combo amp for a bass amp.  It came from the 70's when both the guitar and bass players plugged into the same amp.


A bass amp is what I needed, but what kind?  The immediate answer that most players would say is, "Buy an Ampeg and be done with it."  But there's kind of a problem.  St. Louis Music which used to own Ampeg sold it off.  The new ones are made overseas, and they have had nothing but problems.  My former bass player had one of the new ones, and it was in the shop something like over 15 times.

I thought about Kustom amps, both the old and new models.  However, they don't really have a gain setting on them.  They are some of the best looking amps, but looks don't make the sound. 

So they were off the list.  So I went into Guitar Center, and tried out a few amps.  I also made the smart move of taking one of my own basses.  The bass amps that really impressed me the most were the Acoustic Amp series of amps.  (Acoustic is the brand name.  It is not an acoustic guitar amp.)  They were big in the 70's, and had recently come back from the dead (business wise.) 

I really liked the B100 model.  It was a 100 watt amp with a single 15 inch speaker.  It also had a simple four band EQ, and a gain setting.  Frankly, it was everything that I needed and nothing more. 


It's perfect for small gigs and coffee houses.  Honestly, I'll probably use it more for recording than anything.  It's not too big, and it's not too small.  Although, I'm sure I will be told that I'm, "too loud" while playing in the house. 

Thursday, May 15, 2014

Even In His Youth.... He Wanted To Plug In

Back when I was twelve I started playing cello.  It kind of surprised me how I really got into it, and started being really good at playing.  Anyway, here's a picture of my cello.  Yes, I still have it after all these years.


Anyway, there was one thing a bunch of twelve year olds with instruments liked to do, and that was rock out with their instruments.  I mean, I dreamed of playing, George Throughgood's "Bad to the Bone" on my cello.  (Sidenote: In all fairness, I was twelve.)

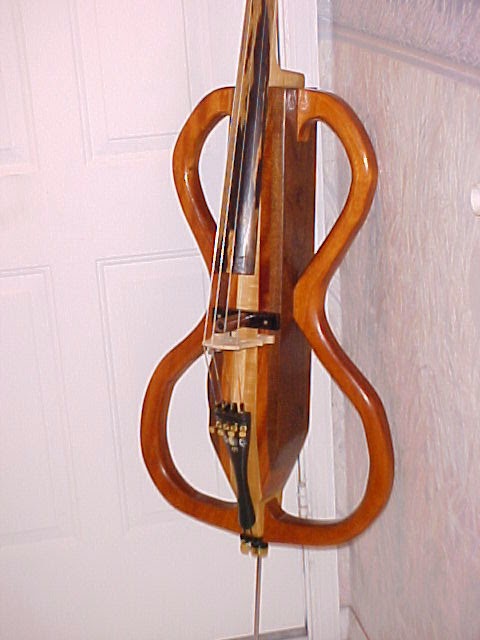
It got me to thinking, couldn't I have an electric cello?  Well part of me answered that question later when I actually built an electric cello.  True story.  Here's the pics.


As awesome as that electric cello is, (and it is by the way,) it's not the kind you rock out with.  When I was thinking about it in high school, I noticed the bass guitar had four strings, and played the lower notes like a cello did.  However, the strings are actually backwards on a bass from a cello.  Or, that's what I thought.  I didn't realize that a bass is in 5ths, and a cello is in 7ths.  It's just a matter of changing the size of the strings, and tuning to a cello's tuning A-D-G-C.

When I was researching this I was originally going to use a baritone guitar, so I would have a few extra strings.  However, there are very few on the market that I like.  It was then that I searched Musician's Friend for a "Short Scale" Bass.

I'm not very high on the cheaper basses, but I have to say one thing about the Fender Squier Short Scale Jaguar Bass.  It has everything I want.  It's short scale, it's in my price range, and it's also in a PJ configuration. 

It seems the fates intervened and I found one locally on Craigslist from a guy not far from me.  I think he had only played it twice or something.  Here's a picture of it.


So here's what I have to do to make it perfect.

1.  Fret dress.  I gave it a rough set-up, but I can't get the action perfect until I put on the correct strings.  I have found a few spots that need touched up on the high G string.

2.  I already have a Seymour Duncan Quarter Pounder bridge J-bass pickup.  So that baby is going in it.

3.  I found a deal on a matching S.D.Q.P. P-Bass pickup.  It's on it's way to the house, and should be here in a few days.

4.  To make it all happen I really need the strings.  Since the cello tuning is in 7ths, the string sizes are really far apart.  They are .035, .055, .080, .125.  So I am going to go to the music shop, and buy the individual strings since I can't buy them as a set.

5.  I was given a strap with this bass, but I think I am going to grab another some time down the road.

But after that I think I will be set, and it will be time to practice.  Of course I will want a bass amp, but that's down the road.  I have my Sunn Alpha 2-12R for the time being. 

So after all this time, I will finally have a cello that I will be able to rock out with.  My inner twelve year old would be so proud. 

Friday, February 14, 2014

Repairing Josh's Guitar.... Yet Again

So my buddy Josh has a bad habit of breaking the neck on his Dean Acoustic.  Here's the original posts from last year.

Part 1:  http://angjellockheart.blogspot.com/2013/05/repairing-joshs-guitar-part-1.html

Part 2:  http://angjellockheart.blogspot.com/2013/05/repairing-joshs-guitar-part-2.html

So he was leaning his guitar against the wall instead of leaving it in it's case.  And you know what happened.  It fell forward, and busted the neck again. 

Of course he doesn't tell me about this.  It's too embarrassing to him, as he's sure I will take pictures and write a blog about it.  Okay, I am doing the blog thing right now.  But I get it from him, and give it a look over.  A broken neck will never break where the previous glue joint was, in that, the glue is stronger than the wood.  So it busted in a different place, but not a bad place.

Normally I would show the picture of the break right here, but I forgot to take one.  I will say this was one of the easier breaks I dealt with.  It didn't break all the way though.  So I stuffed the break full of glue, thinned it out, and forced it down all the way down the break.  Then I clamped it and let it set for three days just to make sure.  Since the break didn't take out any chips of wood, I decided to buff it out instead of sanding it, and it came out smooth.

Now I took this picture with my close up lens, and a HECK of a lot of flash.  Namely, I wanted the crack to show.  But remember, under normal light you don't really see the break(s.)  And the fact that it's on the back of the guitar doesn't hurt. 


Again, under the light it looks rough, but after putting it on the buffer, it's very smooth.  I've had it strung up for a few days now, and it hasn't come apart yet, so that's a good sign. 

So I have worked my magic again.  It will be able to be played once more.  And if Josh breaks it again, once more I will repair it.